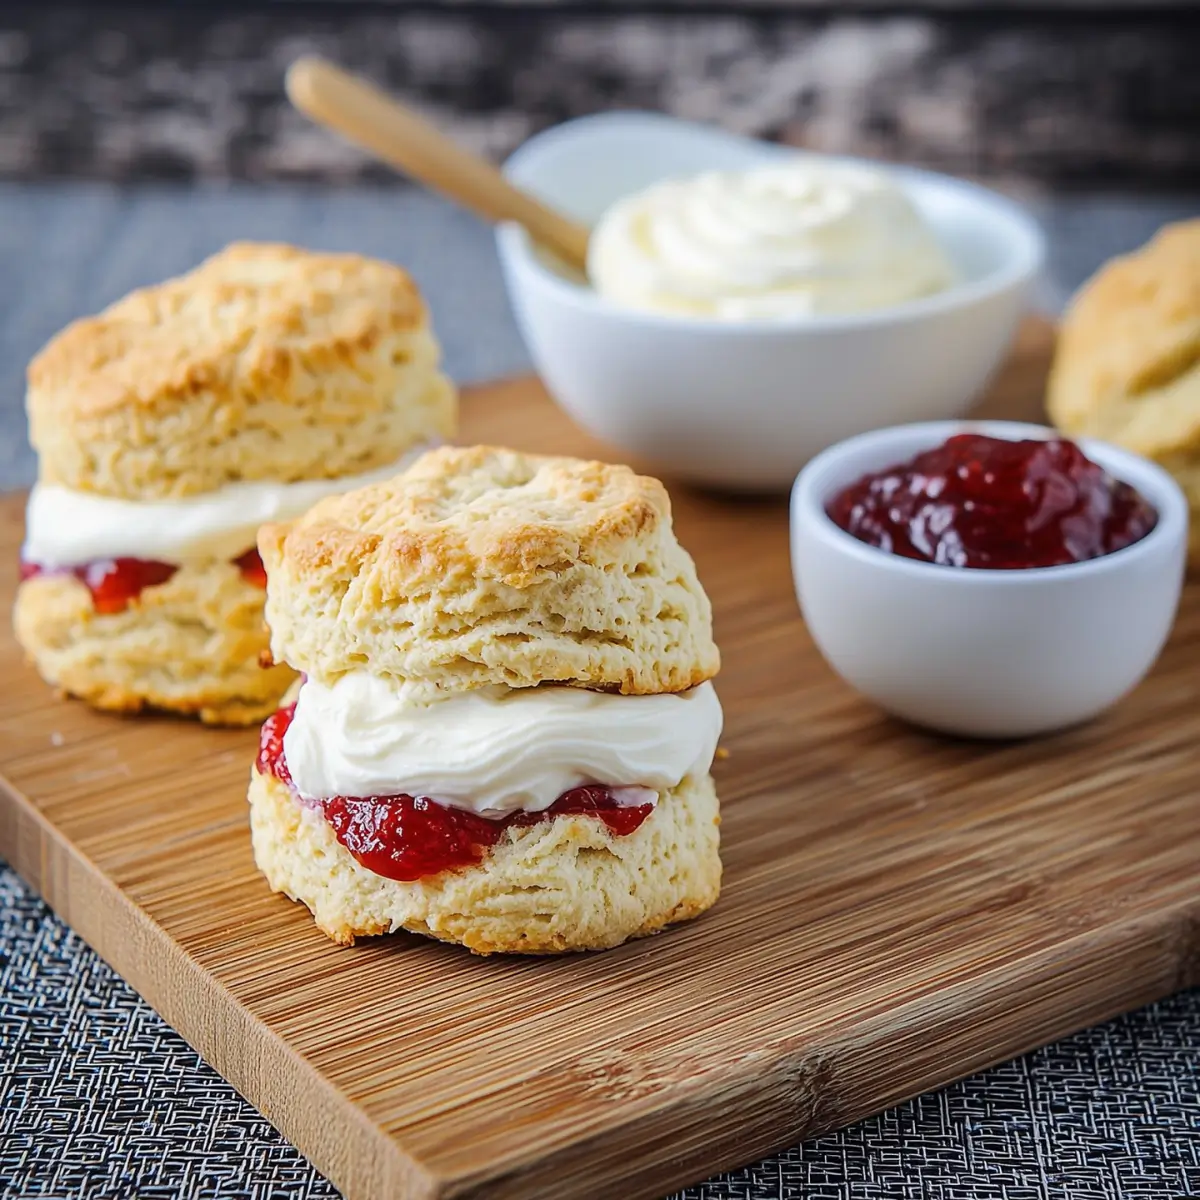
Irish Scones: A Simple Yet Elegant Breakfast Treat
If you’ve been craving a breakfast treat that’s both familiar and just a little special, these Irish Scones hit that perfect spot between simple comfort and bakery-style indulgence. You know the kind—fluffy on the inside, golden on top, ready to soak up melting butter or your favorite jam. And when the kitchen fills with the scent of baking scones, it’s impossible not to feel just a little bit spoiled.
Every time I make Irish Scones, the act of cutting cold butter into flour feels soothing and purposeful—almost meditative. It’s a tactile ritual I look forward to, especially knowing what comes next: warm scones, fresh from the oven, gently steaming as they split apart and beg for a slather of good cream or a sweet spoonful of preserves.

Why These Irish Scones Are a Breakfast Favorite
There’s nothing quite as quietly luxurious as starting your day (or winding down an afternoon) with a homemade Irish Scone. What I love most about these scones is their unpretentious charm—soft, buttery middles; crisp, lightly golden tops; and just enough sweetness to make every bite a little celebration. Whether you’re serving them for an easy weekend brunch, a tea party, or sneaking one warm from the baking sheet, they turn ordinary moments into something a bit cozier.
Irish Scones belong in that rare category of baked goods that feel like both a treat and a tradition. They’re fuss-free, come together with ingredients you probably already have, and somehow manage to be both sturdy and tender at the same time. I’ve watched friends reach for a second scone before they’re even done with the first—always a sure sign that this recipe wins over every kind of breakfast crowd.
What’s Inside These Traditional Irish Scones
It’s the simple beauty of these classic ingredients, working together, that makes Irish scones such a beloved staple. Here’s a quick look at what gives them their signature texture and taste:
- flour – The sturdy backbone for the scones, lending enough structure while keeping them light; all-purpose flour works best for that classic crumb.
- Granulated sugar – Adds a subtle sweetness, just enough to let the buttery flavor shine through without being overly rich.
- Baking powder – The essential lift so your scones rise up fluffy and tall, giving that classic layered effect.
- Salt – Balances sweetness and brings out the best in the butter and buttermilk.
- Unsalted butter – Cold and diced, it creates those flakey pockets and gives your Irish Scones their trademark soft richness; don’t skimp on quality butter here.
- Egg – Helps bind the dough, gives a touch of richness, and contributes to that golden brown top once baked.
- Buttermilk – Brings tender crumb and a gentle tang; if you need a swap, a splash of milk mixed with lemon works in a pinch. Brushing a little on top gives the scones an attractive sheen.
See the recipe card below for the full list of ingredients and measurements.
Baking Irish Scones: A Step-by-Step Guide
Making Irish Scones isn’t intimidating—it just takes a gentle hand and a few kitchen cues. Here’s how the process goes from flour to freshly baked scone:
- Start by heating your oven until it’s properly hot. This is key for scones that puff up and get that golden edge. Line your baking sheet with parchment or, if you’d rather, a light dusting of flour to prevent sticking.
- In your biggest bowl, tip in the flour, sugar, baking powder, and salt. Give it a quick whisk to evenly distribute and break up any sneaky lumps.
- Add the cold, diced butter. Quickly work it in using your fingertips, a pastry cutter, or two forks—whatever feels right. You’re aiming for a crumbly texture, where the butter pieces are the size of small peas.
- Beat together the egg with most of the buttermilk in a small bowl, just until combined. Pour this over your dry mix and stir with a spoon (or your hands!) until the dough is shaggy and just barely coming together.
- If the dough looks a bit dry or crumbly, add the rest of the buttermilk slowly—just enough so the dough can be gently pressed into a soft ball without being sticky.
- Turn the dough out onto a well-floured surface. With light hands, pat (not roll) it into a circle, about as thick as your thumb. Try not to overwork the dough so the scones stay tender.
- Grab a round biscuit or cookie cutter. Press straight down (don’t twist!) to cut your scones—this helps them rise evenly. Gather up scraps, pat together gently, and cut again until you run out of dough.
- Place the rounds onto your prepared baking sheet, leaving just a bit of space between them. Brush the tops lightly with more buttermilk to help that golden finish form in the oven.
- Slide the tray in and bake until your kitchen smells sweet and the scones are golden brown on top—crisp outsides, pillowy insides, and ready for all the toppings your heart desires.
Easy Tips for Fluffy Irish Scones
Getting your Irish Scones to turn out tall and tender isn’t tricky, but a few little tricks make all the difference. First, keep that butter cold—the colder, the flakier your scones will be. If your kitchen runs warm, you can even pop the diced butter (or your whole bowl of mixed dry ingredients) in the fridge for a few minutes before you start forming the dough.
Be gentle when mixing the wet and dry ingredients together—overmixing leads to tough, dense scones, and nobody wants that. If the dough feels sticky, dust your hands and work surface with just enough flour to keep things manageable. Likewise, if it seems a bit dry or isn’t coming together, add a splash more buttermilk until it’s soft but not tacky.
Cut your rounds cleanly, pressing straight down and lifting up, to help them rise high as they bake. Twisting the cutter seals the edges and can prevent that lovely lift. For extra tall Irish Scones, tuck your freshly cut scones close together so they encourage each other to rise up during baking.
If you somehow end up with leftovers, let the scones cool completely before sealing them in an airtight container. They’re best enjoyed fresh, but if you need to reheat, a quick warm-up in the oven will revive their crisp shell and tender crumb.
Serving Ideas and Fun Twists for Irish Scones
While traditional Irish Scones with just butter, jam, or clotted cream are a thing of beauty, you can absolutely play around with mix-ins and toppings to suit the season or your mood. A handful of currants or raisins folded into the dough bring a touch of old-fashioned sweetness, while orange zest or a pinch of cinnamon perks them up for a holiday brunch.
Want a more indulgent breakfast? Try splitting your scones and piling on softly whipped cream with a dot of tangy raspberry preserves. For something savory, a dollop of herbed cream cheese or a few slices of good cheddar works wonders—trust me, these scones aren’t afraid to mingle with savory flavors.
If you like planning ahead, shaped unbaked scones freeze well—just pop them on a tray to freeze solid, then store in a freezer bag. When you’re ready for a warm treat, bake them straight from frozen, adding an extra minute or two as needed.
For pairing, scones love being next to a fresh fruit salad, a pot of black tea, or even a poached egg for a full Irish-inspired breakfast spread. Dress them up or keep them classic—the charm is all in that warm, fragrant crumb.
FAQs about Irish Scones
Can I freeze Irish Scones before or after baking?
You can absolutely freeze Irish Scones both before and after baking. If freezing unbaked, place shaped scones on a tray to freeze individually, then move them to a sealed bag; bake from frozen, adding an extra few minutes. For baked scones, let them cool, then store in an airtight bag and freeze. Refresh them in a warm oven to bring back their best texture.
What’s the best substitute for buttermilk in Irish Scones?
If you’re out of buttermilk, it’s easy to make a quick alternative. Just mix milk with a splash of lemon juice or vinegar, let it sit for a few minutes until thickened, and use it in place of buttermilk in your scone dough. The tangy flavor and tender crumb come through beautifully.
How should I store leftover Irish Scones?
Let scones cool completely, then store them in an airtight container at room temperature for a day or two. For longer storage, freeze as described above. To bring back their just-baked magic, briefly warm them in the oven before serving.
Can I add fruits or chocolate to these Irish Scones?
Yes, mix-ins are a great way to make this recipe your own. Try folding in dried fruits like raisins or currants, a small handful of chocolate chips, or even finely chopped nuts. Add these after you cut in the butter, just before mixing in the wet ingredients, for the best distribution.
A batch of Irish Scones, still warm from the oven, makes any morning feel a little brighter and more comforting. Their irresistibly soft, crumbly texture and classic buttery flavor make them worth baking from scratch—even just to savor with your favorite mug of tea. Whether you stay traditional or play with your own twists, these scones are the kind of simple pleasure that never gets old. Enjoy every tender bite!
Irish Scones
Ingredients
Equipment
Method
- Preheat oven to 400˚F (200˚C). Line a large baking sheet with parchment or lightly flour.
- In a large bowl, combine the flour, sugar, baking powder, and salt.
- Cut in the cold butter using a dough blade, forks, or your fingers until texture becomes coarse and no pieces are larger than a pea.
- In a small bowl, beat together egg and 3/4 cup (177 milliliters) buttermilk. Pour into the flour mixture and gently mix using your hands or a wooden spoon.
- Slowly add the remaining 1/4 cup (60 milliliters) buttermilk only as needed to bring the dough together.
- On a lightly floured surface, gently pat the dough into a circle about 1 inch (2.5 centimeters) thick.
- Use a 2 1/2 inch (6 centimeter) round or biscuit cutter to cut out circles of dough. Gently bring together the leftover scraps of dough to cut out more circles.
- Transfer to prepared baking sheet. Brush the tops with additional buttermilk.
- Bake in preheated oven until golden, 15-20 minutes.