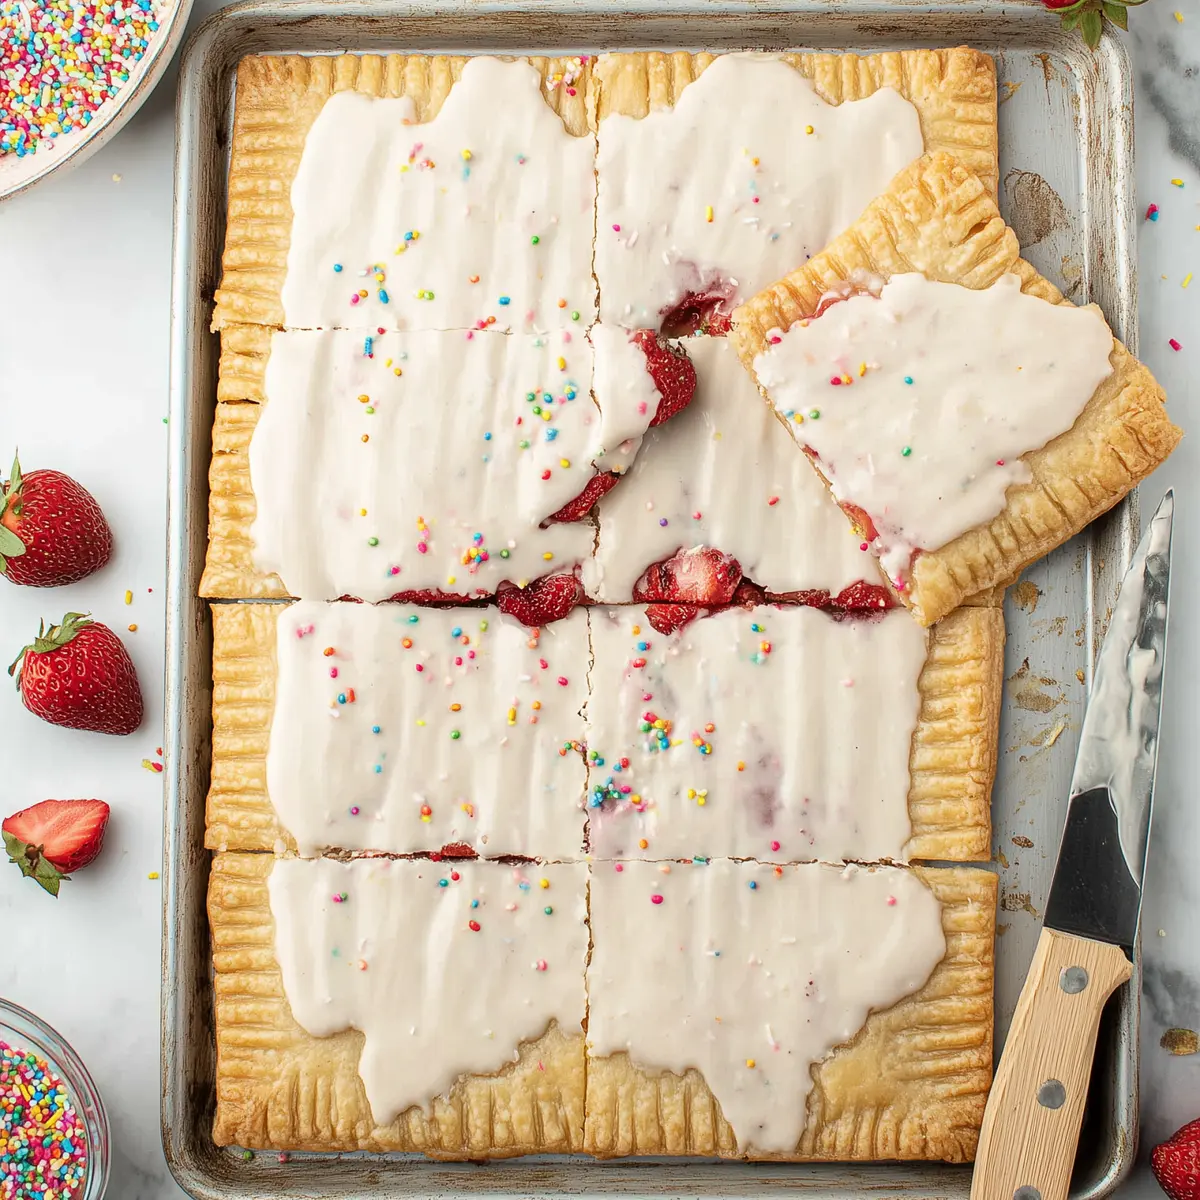
Homemade Strawberry Sheet Pan Pop Tart Recipe Delight
There’s something utterly nostalgic and joyful about a Homemade Strawberry Sheet Pan Pop Tart. The flaky pastry, sticky strawberry filling, and generous heap of sweet icing and sprinkles make every bite a reason to smile—no matter how old you are. Whether you’re pulling out all the stops for a slumber party breakfast or just want to bring back the magic of simpler mornings, this recipe sets the scene for an epic start to the day.
The best part? You don’t need a laundry list of ingredients or hours in the kitchen. With ready-to-bake pie crusts, strawberry preserves, and a couple of baking staples, you’re just a pan and 40 minutes away from a homemade take on a classic treat that’s bigger, bolder, and so much more fun than anything from a box.
Bringing Back Breakfast Magic: Essential Tools
- Large sheet pan – For baking the pop tart all in one epic piece, ensuring plenty of golden, flaky crust and gooey filling.
- Large cutting board – Handy for rolling and trimming pie crusts before transferring to your sheet pan.
- Pastry wheel or sharp knife – Makes shaping those perfect, even edges a breeze.
- Toothpick – For poking gentle holes to keep that crust just right as it bakes.
- Mixing bowl – The go-to spot for stirring up your silky-smooth icing.
- Whisk – Helps get your icing lump-free and perfectly spreadable.
- Fork – Great for crimping and sealing those pie crust edges so not a drop of jam escapes.
- Basting brush – To brush the melted butter all along the crust, delivering that irresistible golden finish.
Inside the Pantry: Sweet, Basic Ingredients for Homemade Strawberry Sheet Pan Pop Tart
- Ready-to-bake pie crusts – The flaky, buttery layers that create that classic pop tart base and envelope the sweet filling. You’ll love how easy they make this recipe.
- Strawberry preserves – Bursts with fresh, fruity flavor and that jammy, sticky sweetness everyone adores in a pop tart. Use the best you can find for a truly stand-out treat.
- Butter – Softened and brushed on top to guarantee a rich, glossy, golden-brown finish.
- Powdered sugar – Whisks up into the creamy icing that makes this pop tart look (and taste) like a celebration.
- Milk – Brings smoothness and spreadability to the icing, keeping it luscious but not runny.
- Sprinkles – The finishing touch for a playful, authentic, and party-ready pop tart. Let your creativity run wild!
See the recipe card below for the full list of ingredients and measurements.
Baking Up Joy: Step-by-Step for Flaky Fun
- Preheat your oven to 190°C. You’ll want it piping hot so the crust turns deeply golden and extra flaky.
- Lay two pie crusts together on a large cutting board. Gently roll them into one even sheet. Use a pastry wheel or sharp knife to trim the edges, shaping a neat rectangle that’s about 30×40 cm—or simply whatever fits your sheet pan best.
- Roll up this crust rectangle and transfer it to a large sheet pan that’s been sprayed with non-stick cooking spray. Unroll carefully to keep that dough smooth.
- Spread strawberry preserves across the center of the pie crust, leaving about a 2.5-cm border around all sides so your filling won’t leak out as it bakes. The glossy red jam will look like a ruby layer waiting to be wrapped up.
- Repeat the rolling and trimming process with the remaining two pie crusts, making a second rectangle the same size as your first. Gently roll this one over the top of your jam-covered bottom crust so you have a full pie sandwich on your pan.
- Use your fingers to pinch along all the edges, then use a fork to crimp and seal—this creates those classic ridged edges and ensures that luscious jam stays put while baking.
- Take a toothpick and poke holes all around the center of the top crust. This step lets the steam escape so your pastry stays crisp, not soggy.
- Brush the entire surface and edges with the softened butter, covering it evenly. It should look shiny and buttery, ready for the oven.
- Slide the pan into the hot oven. Bake for about 25 minutes, rotating halfway through so the crust browns evenly. A golden, slightly puffed finish is your cue that it’s just right.
- If you notice the jam beginning to seep out the sides (especially if you use a pan without a rim), slip another pan underneath to catch any drips. If too much leaks onto your baking sheet, you can pause baking, scoop out excess with a spoon, and return the pan to continue—no drama needed.
- Once golden brown, remove your pop tart from the oven. Let it cool on the pan while you prepare the icing. The kitchen should smell like fruit and pastry heaven right now.
- In a mixing bowl, whisk powdered sugar and milk until smooth and spreadable. It should be thick but pour easily off the spoon—kind of like honey.
- Spread the icing over most of the cooled pop tart, letting the crimped, golden edges peek through. Add your sprinkles while the icing is still tacky for that signature pop tart sparkle.
- Slice into generous squares or rectangles and serve as soon as you’re ready for smiles.
Tips for a Picture-Perfect Pop Tart Experience
Things can get a little wild when you bake up something this fun, so here’s how to keep the process smooth and your Homemade Strawberry Sheet Pan Pop Tart looking (and tasting) its best:
- Seal those edges well: A tight pinch with your fingers plus a good fork crimp will help lock in all the fruity goodness. Missing this step may cause the preserves to leak and bubble over.
- Jam on the loose? If filling escapes in the oven, don’t panic! Pause and scoop excess off the pan, or use a larger pan underneath for drip protection. You’ll still end up with sweet success.
- Don’t skip the poked holes: These little steam vents are key to preventing a soggy, puffy top—it’ll keep that pastry delicate and crisp.
- Let it cool before icing: Icing a hot pop tart will make the glaze run everywhere. Give it time to set, and your icing will be picture-perfect.
- Sweetness level: If you want a less sugary bite, use less icing and lighter sprinkles, as the preserves and crust already add a fair bit of sweetness.
Honestly, the hardest part is waiting for that glaze to set before digging in. The first time I made this, I had to stand guard or the kids would’ve cut into it warm—icing dripping and all!
Pairing and Variation Inspiration for Any Occasion
This Homemade Strawberry Sheet Pan Pop Tart is a celebration on its own, but it plays even better with others:
- Morning pairings: Serve with Greek yogurt, a fruit salad, or a hot cup of coffee for the grown-ups. For kids’ parties, try fruit smoothies or cold milk on the side.
- Make it a dessert: Top a warm square with a scoop of vanilla ice cream or a dollop of whipped cream for an over-the-top treat.
- Customize the filling: Don’t stop at strawberry! Use raspberry, apricot, or blueberry preserves if you want to switch things up. You can even try a chocolate-hazelnut spread for something ultra-indulgent.
- Go festive: Swap sprinkles to match the holiday—pastels for spring, red and green for winter celebrations, or rainbow for birthdays.
- Kid-friendly fun: Let little ones help with crimping the edges or sprinkling on the decorations. It’s the perfect baking project for small hands.
FAQs about Homemade Strawberry Sheet Pan Pop Tart
Can I make Homemade Strawberry Sheet Pan Pop Tart ahead of time?
You can absolutely make this pop tart the night before. Once baked and fully cooled, cover it tightly and store at room temperature. If you’d like to keep the crust at its flakiest, wait to add the icing and sprinkles until just before serving.
Does the recipe work with other fillings or gluten-free crusts?
Definitely! Swap the strawberry preserves for any favorite jam (like raspberry, peach, or even chocolate-hazelnut). For a gluten-free treat, just pick a ready-to-bake gluten-free crust and be sure your jam and sprinkles are suitable too.
How do I store leftover Homemade Strawberry Sheet Pan Pop Tart?
Store any leftover pieces in an airtight container at room temperature for up to two days, or in the fridge if your kitchen is warm. You can enjoy slices at room temp, or warm them gently in a low oven for a few minutes to restore their just-baked magic.
A Slice of Happy Mornings: Homemade Strawberry Sheet Pan Pop Tart
There’s nothing quite like gathering around a table with a Homemade Strawberry Sheet Pan Pop Tart shining at the center, frosting glossy and sprinkles sparkling. As you slice through the crisp, golden crust and see that sweet ribbon of strawberry inside, it’s pure breakfast magic—no toaster required. Pour a glass of milk or brew a fresh coffee, and enjoy a treat made for good mornings, big smiles, and a little extra fun.
More Delicious Recipes
- Irish Shortbread: If you love flaky pastries, this buttery treat will satisfy your cravings with a melt-in-your-mouth texture.
- Lucky Charms Bars: These fun bars combine sweet cereal and marshmallows for a delightful snack that’s sure to bring a smile.
- Colcannon Irish Potatoes with Bacon: A comforting dish that pairs well with sweet pastries for a complete breakfast experience.
Homemade Strawberry Sheet Pan Pop Tart
Ingredients
Equipment
Method
- Preheat oven to 375°F.
- On a large cutting board, roll two of the ready-to-bake pie crusts together. Use a pastry wheel or sharp knife to cut the combined crusts to measure a rectangle that is 12×16-inches or the best size that will fit your sheet pan.
- Gently roll the crust up and transfer it to a large sheet pan that has been sprayed with non-stick cooking spray.
- Spread the strawberry jam on the center of the pie crust leaving a 1-inch border around the edges.
- On the same large cutting board, roll the other two ready-to-bake pie crusts together and trim so that it is the same size rectangle you have already on the sheet pan. Gently roll the top crust up and transfer it to lay evenly over the top of the strawberry jam topped crust on the sheet pan.
- Using your fingers, pinch together the two crusts all around the edges of the pop tart. Then use a fork to gently press and seal the edges together to seal the jam in.
- Use a toothpick to poke holes all over the top of the center of the pop tart.
- Brush all over the top and edges of the pop tart with the softened butter.
- Bake for about 25 minutes or until the crust is golden brown, rotating the sheet pan halfway through the baking time.
- If the jam starts to seep out of the edges and you’re not using a rimmed sheet pan, either place a larger pan underneath the pan in the oven so the jam doesn’t drip into your oven or remove the pop tart and scoop the jam from the pan and then return it to the oven to continue baking.
- Remove the pop tart from the oven and let cool while you make the icing.
- In a small mixing bowl, whisk together the powdered sugar and milk until smooth and of spreading consistency.
- Spread icing on top of the center of the pop tart leaving the crimped edges showing. Immediately sprinkle with sprinkles.
- Slice and serve.