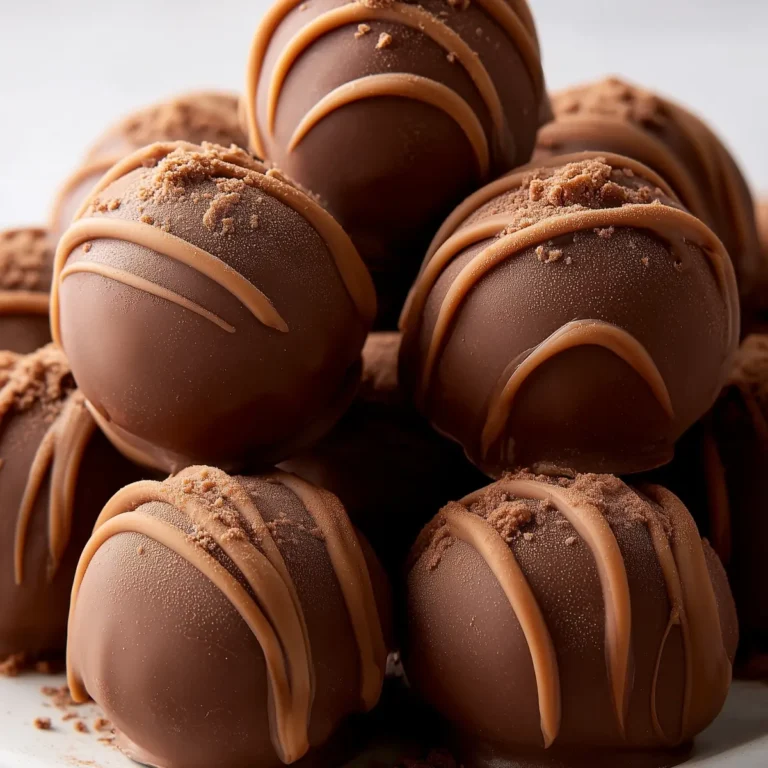
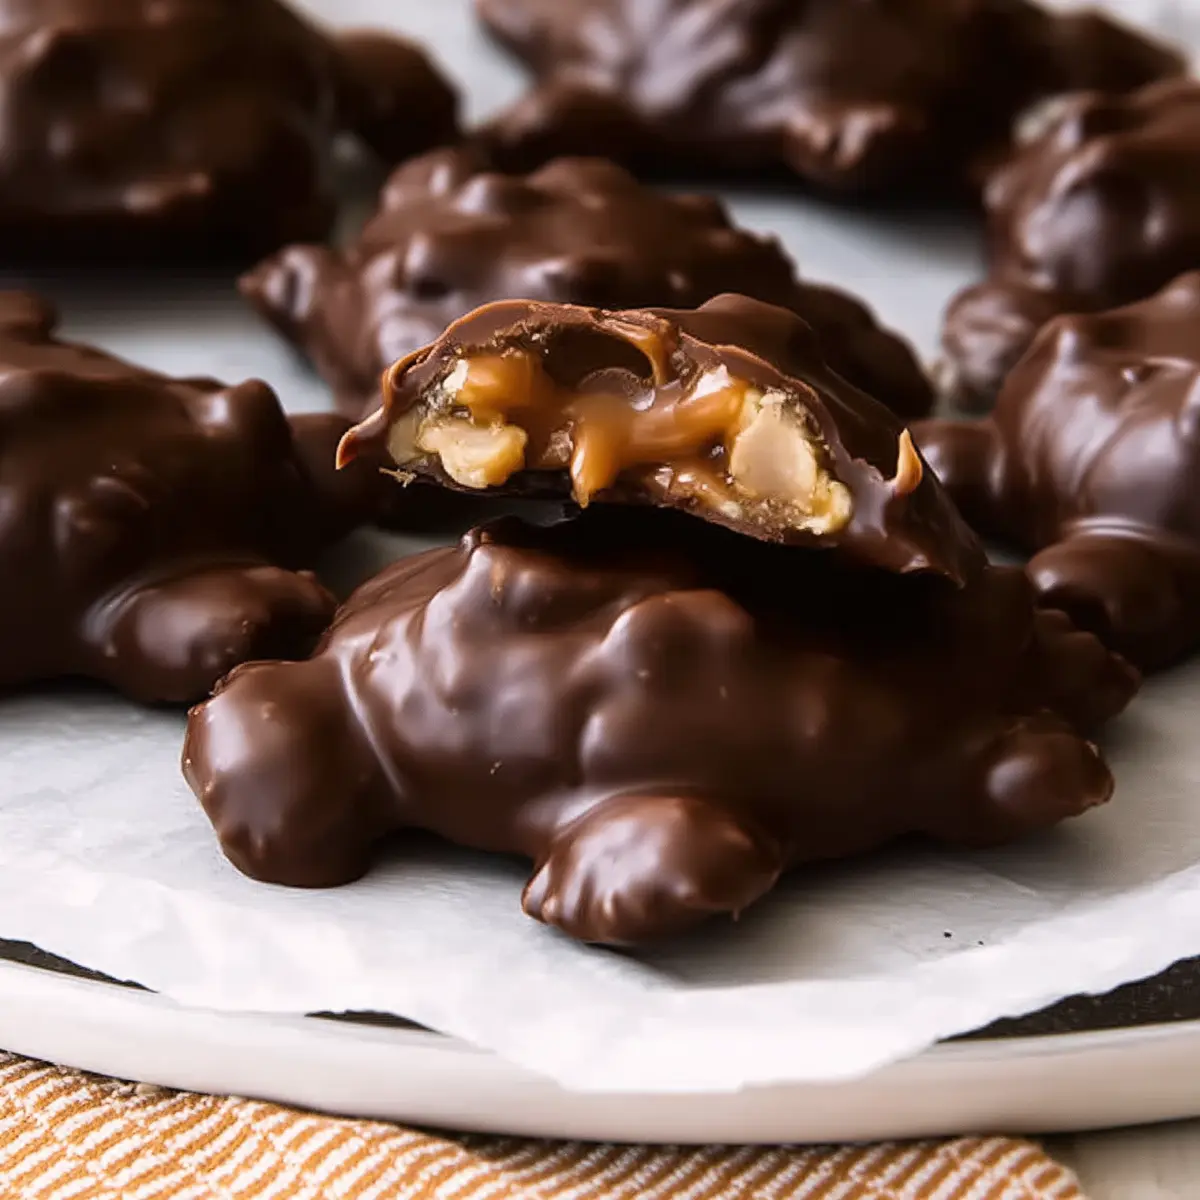
Homemade Chocolate Turtles: A Delicious Treat
Some afternoons just call for chocolate. The cozy kind of afternoon when you can hear rain tapping on the windows, the kitchen is filled with that irresistible aroma of toasted pecans, and you know you’re about to create something magical—a batch of homemade chocolate turtles. There’s just nothing quite like the combination of chewy, buttery caramel, crunchy nuts, and a thick layer of silky chocolate. Whether you’re sharing them on a holiday platter or stealing one for yourself with a cup of coffee, these turtles taste even better than store-bought and come together faster than you’d think.
What makes these homemade chocolate turtles so irresistible
There’s a certain joy in the first bite of a homemade chocolate turtle: that gentle snap as you break through the chocolate, the nutty aroma, and then the flood of caramel flavor that lingers on your tongue. It’s a treat that’s both nostalgic and a little bit luxurious. The secret to these homemade chocolate turtles is all in the balance—roasty pecans for crunch, caramel that holds its shape yet stays chewy, and chocolate that melts in your mouth.
Making these yourself is a small act of candy magic. You’re in charge of the thickness of the chocolate, the saltiness of the caramel, and you can sneak as many extra nuts into each piece as you want. They’re easy enough to whip up for a weekday treat but also a total showstopper to gift or serve at family gatherings.
The ingredients that bring homemade chocolate turtles to life
Great homemade chocolate turtles start with a handful of staple, high-impact ingredients. Here’s what you’ll need:
- Butter – gives the caramel its signature richness and melt-in-your-mouth texture.
- Light brown sugar – adds depth and that warm, almost toffee-like note to the caramel.
- Granulated sugar – balances the flavors and helps the caramel set just right.
- Sweetened condensed milk – brings creaminess and body to the caramel, for that signature ultra-chewy bite.
- Light corn syrup – prevents your caramel from crystallizing, keeping it smooth and glossy.
- Vanilla extract – a splash at the end rounds out the caramel and brings everything together.
- Pecan halves – the classic nut for turtles; toast them first for extra flavor and crunch.
- Almond bark or high-quality chocolate – creates that luscious, snappy chocolate shell. Use dark, milk, or a blend—whatever you love most.
See the recipe card below for the full list of ingredients and measurements.
Step-by-step: how to craft your own chocolate turtles
You don’t need any fancy candy equipment or hours at the stove to make these. Here’s how it all comes together:
- Start by toasting your pecans. Spread them in a single layer on a baking sheet and bake them until they’re deeply aromatic but not burned—you should catch that nutty scent as soon as you open the oven.
- Let the pecans cool, then give them a rough chop so you get a good mix of big and small pieces in every bite.
- Line a baking sheet with parchment paper or a silicone mat. This is where your turtles will rest and set up—no sticking, no fuss.
- Make the caramel in the microwave: melt the butter in a large bowl, then stir in both sugars, sweetened condensed milk, and corn syrup. Stir well, then microwave until the caramel thickens and reaches soft-ball stage. You can check with a thermometer, but the ice water method works great—drop in a bit of caramel and see if it forms a soft, squishy ball between your fingers.
- Carefully remove the hot bowl (use oven mitts—the bowl can get steamy). Stir in the vanilla, then fold in the chopped pecans so every piece is coated in that sweet, buttery caramel.
- Drop generous spoonfuls of the caramel-pecan mix onto your lined baking sheet. You can make them as large or small as you like, just keep the clusters a little apart so they don’t run together. Refrigerate until the caramel sets and holds its shape.
- Melt your chocolate or almond bark—either in the microwave in short bursts, stirring between each, or using a double boiler for extra control. Aim for smooth, lump-free chocolate that flows easily.
- Using a fork, dunk each caramel-pecan cluster in the melted chocolate, making sure it’s fully coated. Let excess chocolate drip off by gently tapping your fork, then return each turtle to the lined sheet.
- Let the chocolate set until firm to the touch. If you’re impatient (like I always am), pop the pan in the fridge to hurry things along.
Nailing that texture – soft caramel, crunchy pecans, and glossy chocolate
The magic of the perfect homemade chocolate turtle is all about contrast. Crisp, toasted pecans bring snap and subtle bitterness. The caramel should walk that line between chewy and creamy—it shouldn’t ooze everywhere, but it should definitely stick to your teeth a little! Watching caramel in the microwave is its own adventure, and you’ll notice the color darken slightly and the smell get richer when it’s ready.
As for the chocolate, use the best you can find or the kind you truly crave. Some days I’ll reach for silky milk chocolate, other days it’s a deep, almost brooding dark chocolate. Whichever you pick, letting the chocolate set until it’s perfectly glossy will give you that show-stopping look and bite. If you like a sweet-salty finish, sprinkle a little flaky sea salt on top before the chocolate sets. It does wonders.
Tips, variations, and how to store these turtles for max freshness
A few tiny tweaks make a big difference when making homemade chocolate turtles. First, watch your caramel like a hawk—microwaves vary, so shorter, frequent intervals are better than risking burnt sugar. If your caramel turns out a little too stiff or runny, don’t panic! A touch more or less cook time next batch will fix it.
Feel free to swap in other nuts—walnuts or cashews are both delicious, though pecans keep that classic taste. If you’re sensitive to corn syrup, honey can work in a pinch, but the caramel texture will be a bit different. For the chocolate, go as luxe or as thrifty as your mood (or pantry) allows.
To store, layer the cooled turtles between pieces of parchment or wax paper in an airtight tin. They’ll stay fresh at room temp for a couple of weeks or longer in the fridge. For longer storage, freeze them and thaw just what you need. These make wonderful gifts—just be sure to hide a few for yourself.
FAQs about Homemade Chocolate Turtles
Can I use a different nut instead of pecans in homemade chocolate turtles?
Absolutely—walnuts, cashews, or even almonds are all tasty swaps. The flavor and crunch will be slightly different, but the caramel and chocolate pair beautifully with most nuts.
How do I keep the caramel from turning hard or grainy?
Caramel hardens if it’s overcooked or if the sugar crystalizes. Stir the caramel well before heating, and watch it closely as it cooks. If you use a candy thermometer or the ice bath test, stop microwaving as soon as it thickens and forms a soft ball.
Are homemade chocolate turtles freezer-friendly?
Yes, they freeze beautifully! Let them chill until fully set, then layer with parchment in a freezer-safe container. They’ll keep for a couple of months. Let them come to room temperature before serving to restore the best texture.
How long will homemade chocolate turtles stay fresh?
When stored in an airtight container at room temperature, homemade chocolate turtles will stay fresh for up to two or three weeks. If you plan to keep them longer, storing them in the fridge or freezer works well.
What kind of chocolate is best for making chocolate turtles?
You can use milk chocolate, dark chocolate, or even white chocolate, depending on your preference. Almond bark melts easily and holds up well, but any high-quality chocolate bar or chips are great—just be sure to melt it gently so it stays smooth and shiny.
After the last chocolate turtle has set and the kitchen is filled with that finishing hint of caramel in the air, it’s hard to resist sneaking just one more. There’s something incredibly satisfying about crafting homemade chocolate turtles by hand: each one a little different, each with that perfect combination of sweetness, crunch, and creamy chocolate. Pour a cup of coffee, call over someone you love to share, and savor that homemade touch—these really are candy store treats made for cozy days at home.
More Delicious Recipes
- Irish Beef Stew: This hearty dish is perfect for cozy afternoons, just like making chocolate turtles.
- Irish Shortbread: Enjoy a sweet treat that pairs wonderfully with coffee, similar to your homemade turtles.
- Lucky Charms Bars: These fun treats add a playful twist to snack time, just like your delightful chocolate turtles.
Homemade Chocolate Turtles
Ingredients
Equipment
Method
- Preheat oven to 350 degrees F.
- Toast and chop pecans: spread pecans out onto a baking sheet and bake for 5-10 minutes, stirring once, until toasted and fragrant (but not burned!). (Alternately, you can heat them in a hot skillet stirring constantly until they are fragrant, about 5 minutes). Once cooled, roughly chop the pecans and set aside.
- Line a baking sheet with parchment paper or a silpat liner. Set aside.
- Microwave Caramel: Place butter in a large microwave safe bowl and heat in microwave until melted. Add brown sugar, granulated sugar, sweetened condensed milk, and corn syrup and stir well to combine. Return bowl to microwave and cook mixture on HIGH power for about 6-8 minutes, or until it reaches about 235 degrees on an instant read thermometer, or use the ice water bath test.
- (For Ice bath test, spoon a small spoonful of the caramel into a cup of ice water. Use your fingers to pinch the caramel—it should come together into a soft ball. If it won't come together to form a ball in your fingers, return it to the microwave for an additional 30 seconds, and test again.)
- Use hot pads to carefully remove the bowl from the microwave. Stir vanilla into hot caramel. Stir in chopped pecans.
- Form Turtles: Drop large spoonfuls of the mixture onto the parchment paper lined baking sheet to create individual mounds of caramel candy. (I usually get about 20, but you can make the candies as small or large as you like). Refrigerate until set, about 20 minutes.
- Melt almond bark or chocolate in microwave or use a double boiler, stirring every 30 seconds, until melted and smooth.
- Dip: Drop a pecan cluster into the melted chocolate and use a fork to coat it all over. Lift the cluster up with a fork, and tap it several times to allow excess chocolate to fall through the tines of the fork, into the bowl. Place dipped clusters on the parchment paper to set up.
- Store turtles in an airtight container at room temperature or in the fridge for 2-3 weeks.