Green Velvet Brownies: Fudgy Fun for Any Occasion
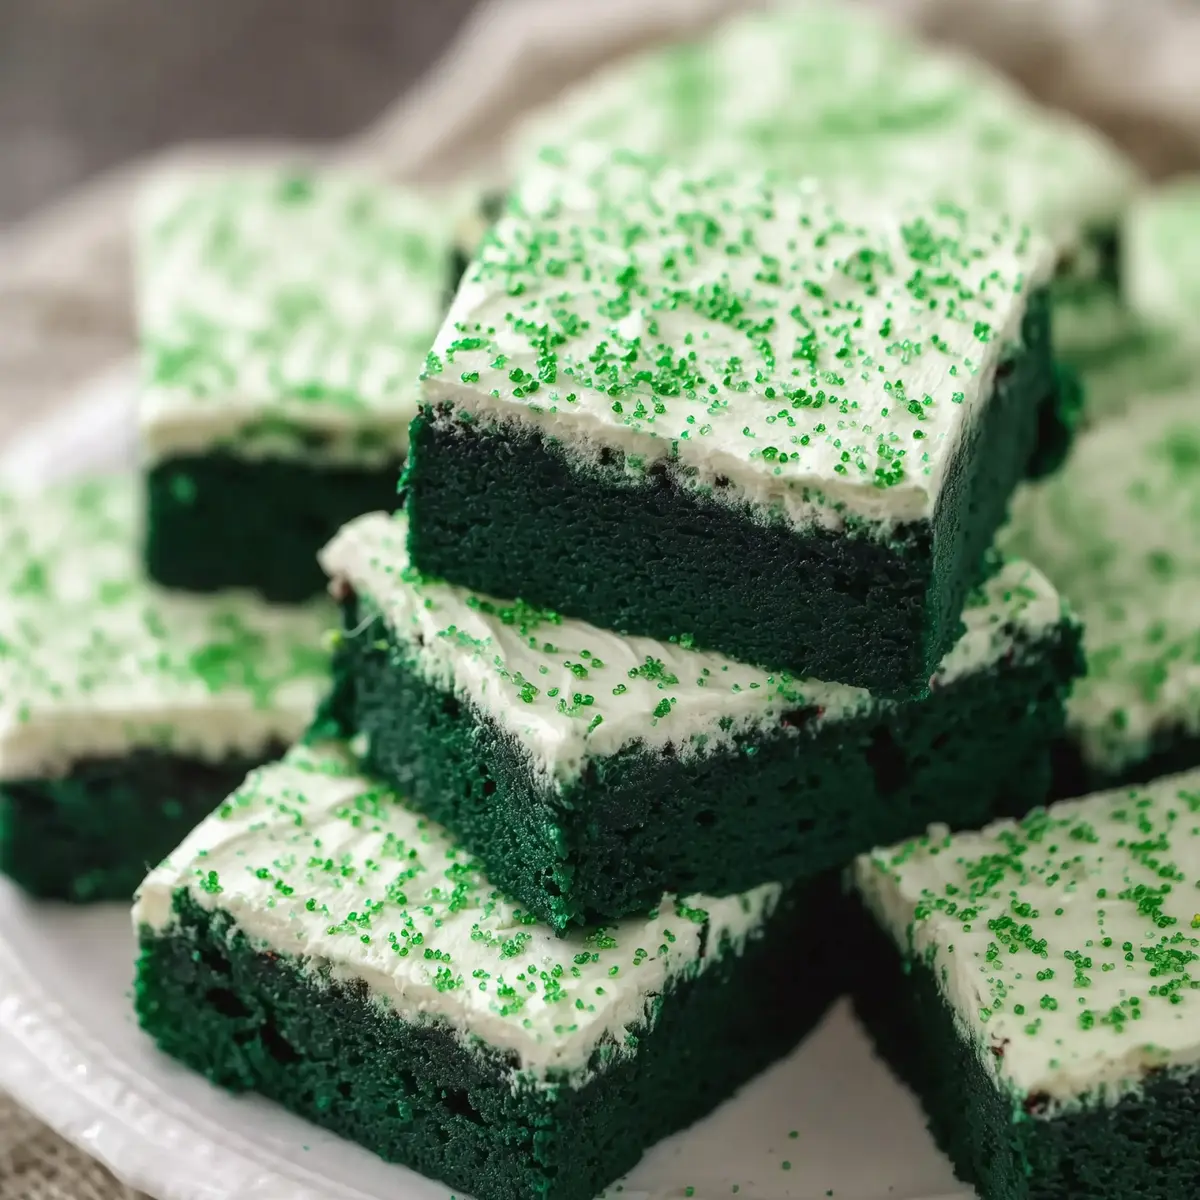
You know those days when you’re craving something sweet but want to make it a little playful—maybe for a holiday, a potluck, or just because it’s Thursday? That’s where these Green Velvet Brownies come in. They’re fudgy, vivid green, and topped with a creamy vanilla frosting that always gets attention (and usually begs for seconds).
The first time I made these brownies, I was prepping for a St. Patrick’s Day get-together. I’ll be honest: watching the green batter swirl together with the rich smell of chocolate drifting through the kitchen just made me happy. And the best part? People couldn’t get enough—there’s something about these that feels festive but also totally homemade.
Why These Green Velvet Brownies Stand Out
Rich, fudgy brownies are always a win, but these Green Velvet Brownies take things to another level. The soft chocolate base gives you all the decadence of classic brownies, but thanks to that bold green hue and a blanket of silky vanilla frosting, you get something surprising and just a little magical.
They’re ideal when you want something fun for a party, especially if you love making dessert feel a little extra. Perfect for St. Patrick’s Day, Christmas, or anytime you want to see smiles (and a little curiosity!) when dessert hits the table. The cream cheese frosting adds a creamy, slightly tangy finish that balances out all that chocolatey goodness. Expect people to ask for the recipe. Really.
What Goes Into These Green Velvet Brownies
Let’s talk about the good stuff hiding in your batter bowl and frosting dish. Here’s what you’ll need to whip up these green beauties:
- Semi-sweet chocolate chips – Bring that deep, fudgy chocolate flavor and help achieve that signature brownie texture.
- butter – Adds richness and keeps the brownies moist all the way through.
- Granulated sugar – Sweetens the brownies, keeps the crumb tender, and adds just a touch of crispness to the edges.
- Eggs – Provide structure and give you that lovely, slightly chewy bite.
- All-purpose flour – The backbone of the brownies, keeping everything together without making them too dense.
- Green liquid food coloring – Delivers that iconic jewel-toned green! A must if you want true green velvet.
- Baking powder – Helps the batter puff just enough so you don’t get a flat, heavy slab.
- Vanilla extract – Rounds out the flavors in both the brownies and the frosting.
- Salt – Just a pinch to keep the flavors balanced and deepen the chocolate notes.
- Cream cheese, softened – Gives the frosting a tangy creaminess and that classic velvet-cake finish.
- More butter, softened (for frosting) – Blends with cream cheese to make the frosting smooth and spreadable.
- Powdered sugar – Sweetens and thickens the frosting while keeping it fluffy.
- A second splash of vanilla (for frosting) – Makes the frosting taste more like ice cream, if you ask me.
- A little extra salt (for frosting) – That secret pop so your frosting doesn’t get too sweet.
See the recipe card below for the full list of ingredients and measurements.
How to Make Green Velvet Brownies Step by Step
Let’s walk through exactly how these brownies come together—from rich green batter to frosted perfection.
- Preheat your oven and get your baking pan ready. I like to line mine with foil and give it a quick grease. The foil “handles” make it so much easier to lift the brownies out cleanly later.
- Melt your chocolate chips and butter together—either in the microwave, in short bursts, or gently over a double boiler. It should be glossy and smooth, swirling into a kind of shiny chocolate puddle. Let it cool slightly so you don’t scramble your eggs later on.
- Whisk in the sugar while the chocolate mixture is still warm (but not hot). Next, add the eggs, dropping them in one at a time and mixing after each. The batter will look thick, glossy, and just a little satiny as you stir.
- Fold in your flour, baking powder, and salt, along with a splash of vanilla and that green food coloring. You want a uniform, bold green without streaks, so mix until just combined. Try not to overdo it or you’ll lose the fudginess.
- Pour the bright green batter into your prepared pan. Use a spatula to nudge it into the corners and even out the top. Slide it into the oven and bake until the edges are set but the middle still feels just a bit soft.
- Once out of the oven, let the brownies cool fully in the pan on a wire rack—don’t rush this step! The wait is worth it. They’ll firm up and set, making them much easier to frost.
- While the brownies cool, beat together your cream cheese and softened butter until completely smooth and creamy. Gradually add the powdered sugar and salt, then finish with vanilla. The result should be fluffy, glossy, and easy to spread.
- Once completely cool, lift the brownies from the pan using the foil, peel away the foil, and spread the frosting evenly from edge to edge. For extra fun, add sprinkles, sanding sugar, or colored chips if you like. Slice into squares. Serve immediately or chill for cleaner edges and crisp frosting.
Tricks for Irresistible Green Velvet Brownies
Some desserts just thrive on a little extra attention, and Green Velvet Brownies are no exception. Here’s what I’ve learned after one too many “almost-there” batches:
- Always let the melted chocolate and butter mixture cool slightly before adding eggs, or you’ll risk scrambling them (never a good look in brownies).
- Mixing is key—blend wet and dry just enough to banish flour pockets, but stop before the batter stiffens. Less stirring = more fudgy center.
- Don’t skimp on the foil lining! It makes for the easiest removal and beautiful, even-edged brownies.
- The toothpick test works, but you want some moist crumbs attached when checking doneness. If it comes out totally clean, you’ve baked a bit too long.
- For the frosting, use cream cheese and butter at room temperature. Your mixer will thank you and so will your arms.
- If you’re after tidier slices, chill the frosted brownies in the fridge for a bit before cutting.
- Store leftovers in an airtight container in the fridge to keep the frosting from getting too soft. Bring to room temp for the best flavor and texture.
Festive Variations and Serving Ideas for Green Velvet Brownies
Let’s be honest—half the fun of these brownies is making them your own. Here are some ways to play:
- Swap out the food coloring for red to create “red velvet” brownies when the holidays roll around, or try blue for a baby shower or birthday.
- Add a handful of white chocolate chips to the batter for little pops of creaminess and extra texture.
- Sprinkle chopped pistachios or almonds on the frosting for some crunch and a nutty contrast against the sweet cream cheese.
- Drizzle with melted chocolate of any color or finish with St. Patrick’s-themed sprinkles for extra celebration.
- Serve squares on a platter surrounded by fresh berries for a quirky brunch or as a colorful dessert tray centerpiece.
- These freeze really well, frosting and all—just layer between parchment and pop into a freezer-safe container. Thaw in the fridge and let them come to room temp before serving.
- For a next-level treat, serve slightly warm with a scoop of vanilla or mint ice cream. That cold-and-fudgy combo? Unreal.
FAQs about Green Velvet Brownies
Can I make Green Velvet Brownies ahead of time?
Yes, you can make these brownies a day or two in advance. Just bake, cool, and frost as directed, then store in an airtight container in the fridge. Bring to room temperature before serving to get that soft, fudgy bite.
Do Green Velvet Brownies freeze well?
Absolutely! These brownies freeze beautifully, even with the frosting. Place slices between layers of parchment and store in a container. When you’re ready to serve, let them thaw in the fridge overnight.
What kind of green food coloring should I use for the best color?
Liquid food coloring works best for getting a bright, uniform green in your batter. Gel can be used for a more concentrated shade, but start with a small amount and work up—you want vibrant, not neon!
Can I use a different frosting instead of cream cheese?
Definitely. If cream cheese isn’t your thing, try a classic vanilla buttercream or even a whipped ganache for a different twist. Just make sure the frosting is sturdy enough to hold its shape atop these moist brownies.
There’s something endlessly satisfying about biting into one of these Green Velvet Brownies—the glossy green crumb, the creamy swirl of frosting, and that cocoa-rich aroma that follows you from oven to plate. Whether you keep things classic or go wild with toppers and color, this recipe brings a burst of fun to any table. So slice in, pour a cup of coffee or cold milk, and savor every soft, sweet, ridiculously green bite.
More Delicious Recipes
- St. Patrick’s Day Brownie Trifle: This delightful dessert layers brownies with creamy elements, making it a festive addition to any occasion, especially St. Patrick’s Day.
- Lucky Charms Bars: A fun, colorful treat that complements the playful vibe of your Green Velvet Brownies, perfect for a sweet tooth.
- Irish Potato Bites: These savory bites are a great contrast to your sweet brownies, offering a tasty balance for your holiday or potluck treats.
Green Velvet Brownies
Ingredients
Equipment
Method
- Preheat oven to 350°F. Line a 9-inch square baking pan with foil, extending over the edges, and lightly grease.
- Melt chocolate chips and butter together in a microwave-safe bowl in 30-second intervals until smooth. Let cool slightly.
- Whisk in sugar, then add eggs one at a time, mixing after each addition. Stir in flour, food coloring, baking powder, vanilla, and salt until combined.
- Pour batter into prepared pan and spread evenly. Bake for 44–48 minutes, or until a toothpick inserted near the center comes out with moist crumbs.
- Cool brownies completely in the pan on a wire rack for about 2 hours before frosting.
- In a bowl, beat cream cheese and butter until smooth. Gradually add powdered sugar and salt. Mix in vanilla until fluffy.
- Lift brownies from pan, peel off foil, and spread frosting evenly. Cut into 16 squares. Optional: garnish with sprinkles.