Crostoli: Delightful Italian Pastries for Celebration
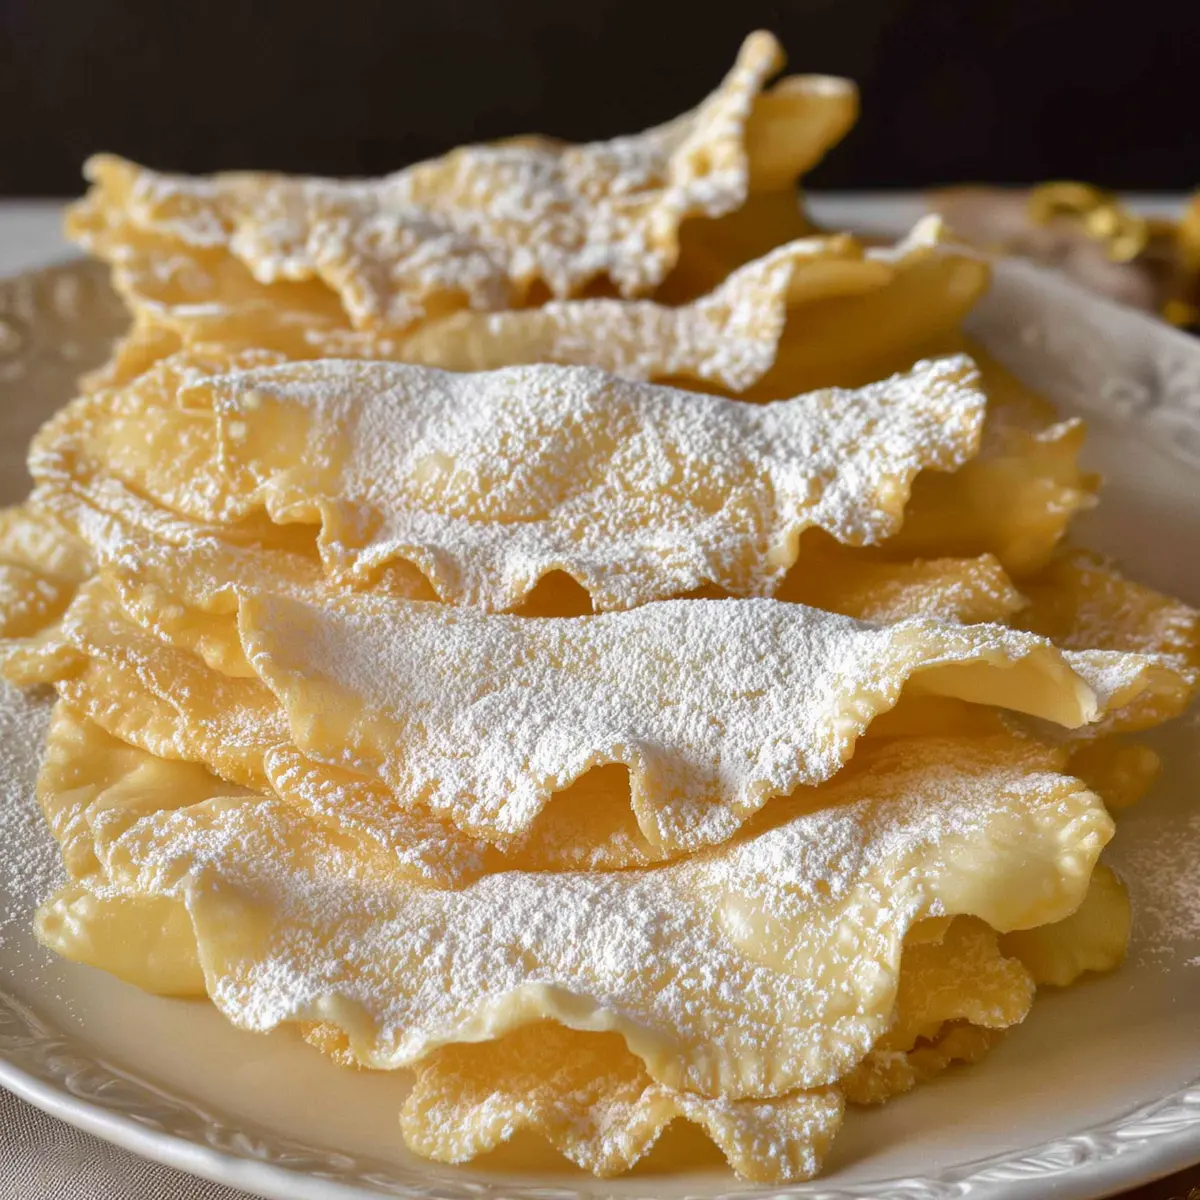
Crostoli are the essence of celebration, instantly recognizable by their sweet aroma and delicate, shattering crisp. Whether you know them as Italian bow tie cookies, chiacchiere, or angel wings, there’s something undeniably joyful about dusting a fresh batch with a cloud of powdered sugar. These festive pastries, loved during Carnevale just before Lent and treasured at Christmas, are the sort you’ll want to grab by the handful—and stopping at one is truly impossible.
What I love most about crostoli is how they evoke gatherings and laughter. Making them fills the kitchen with the gentle sizzle of frying dough and the anticipation of that very first bite. Their golden, lacy finish looks intricate, but the process is straightforward and deeply satisfying, perfect for sharing with family or friends.
Tools for tender crostoli and a festive kitchen
- Clean work surface – for shaping and kneading the dough comfortably.
- Stand mixer with paddle and dough hook (optional) – to mix and knead the dough efficiently, though hand mixing works well too.
- Pasta machine or roller – creates consistently thin, delicate pastry sheets for crisp crostoli.
- Sharp knife or pastry cutter – for cutting beautiful strips and shaping each cookie just right.
- Frypan (heavy, high-sided) – keeps oil safely contained for even frying.
- Forks – handy for turning crostoli gently in hot oil.
- Kitchen thermometer – helps you maintain the perfect oil temperature for light, airy pastries.
- Absorbent paper or paper towels – removes any excess oil for a cleaner, crisper finish.
- Airtight container – stores your crostoli for maximum freshness and crunch.
Crostoli ingredients and their roles
- Flour – the all-important base, giving structure and that signature lightness when rolled thin.
- Whole eggs – bring richness, color, and tenderness to every bite.
- Egg yolk – boosts flavor and adds softness to the dough.
- Granulated white sugar – lends just the right hint of sweetness and helps develop a golden crust.
- Butter (slightly softened) – creates a mellow, supple dough with a beautiful crumb.
- Brandy – gives complexity and aroma without an overpowering alcohol flavor.
- Vanilla extract – layers warmth and classic sweetness throughout.
- Salt – balances flavors, keeping the sweetness lively and the dough well rounded.
- Peanut oil, for frying – chosen for its neutral flavor and high smoke point, ensuring a crisp finish.
- Powdered sugar, for dusting – the snowy crown that makes crostoli look as irresistible as they taste.
See the recipe card below for the full list of ingredients and measurements.
Rolling, frying, and finishing crostoli: step by step
- Place the flour on a clean work surface or into your mixer bowl.
- If mixing by hand, make a well in the center of the flour and add eggs, egg yolk, sugar, butter, brandy, vanilla, and salt. If using a stand mixer, add the same ingredients to the flour in the bowl, using the paddle attachment.
- Blend the wet ingredients into the flour, gradually pulling the flour in until a dough starts to form. If needed, add a splash more brandy until the dough comes together into a ball.
- Knead by hand or with the mixer’s dough hook for 5 minutes—keep going until the dough feels smooth and elastic between your palms.
- Cover and let the dough rest for 30 minutes. It will soften and become easier to handle.
- Cut off a small chunk of dough and flatten it enough to fit into your pasta machine.
- Pass the dough through the machine’s widest setting. Fold in half and repeat 5–6 times, dusting lightly with flour as needed, until the dough looks extra silky and smooth.
- Gradually roll the dough thinner by moving through each setting, finishing on the finest setting for a sheer, delicate texture. You can repeat the thinnest pass for even more crispness or use your hands to gently stretch the sheets.
- Lay the pasta sheets on your work surface. Using a sharp knife or pastry cutter, slice into strips about 5 centimeters wide and 10–15 centimeters long—aim for ribbons, but any shape will work.
- For the signature crostoli twist, make a small slit in the middle of each strip, then thread one end through and gently pull to shape.
- Heat peanut oil in a heavy, high-sided frypan to 180°C. Use a thermometer for accuracy.
- Slip a few crostoli into the oil at a time—they’ll puff and bubble in seconds. Fry for about 30 seconds each side, turning once bubbles form and before they get too dark. Watch for a light golden color.
- Lift out with forks, letting excess oil drip away, and set on absorbent paper. Crostoli will be slightly soft at first but will crisp up beautifully as they cool.
- Once cool, shower generously with powdered sugar so every ridge and twist is sweetly snowy.
- Transfer to an airtight container. Properly stored, they stay fresh and snappy for up to two weeks.
Tips, troubleshooting, and common crostoli mistakes
Frying crostoli is easier than you think, but a few small details will help you get that perfect light crunch. Most importantly, keep your oil hot enough—if it drops below 180°C, crostoli will cook slowly, absorb oil, and turn heavy and greasy. If the oil’s too hot, they’ll brown before cooking through. Use a kitchen thermometer for peace of mind.
Roll the dough as thin as you can; it should almost feel like silk between your fingers. If the dough’s too thick, your crostoli will be chewy instead of crisp. Work in small batches to avoid letting rolled dough dry out before frying—it can make shaping difficult and the texture less airy.
If crostoli are undercooked, they may stay soft or soggy rather than crisping as they cool. Remember, they should come out lightly golden, never brown—a deep color means they’ve overcooked and could taste bitter. Finally, serve them only once they’re cool, so the signature crunch can shine.
Delicious pairings and crostoli variations to try
Crostoli are delicious all on their own, but they’re also the perfect companion to a cup of espresso or a glass of dessert wine. Serve them alongside a fruit salad for a contrast of textures, or pair them with a vanilla gelato for an indulgent treat. Around Christmas, a sprinkle of orange zest or a pinch of cinnamon in the dough can bring a lovely festive note.
If you’d like more complex flavor, try swapping vanilla extract for almond or orange extract, or even add a touch more brandy for grown-up warmth. To make crostoli alcohol-free, you can replace the brandy with milk—some regions and families use a splash of lemon juice for brightness.
Kids love crostoli dusted extra thick with powdered sugar, while adults might enjoy a touch of spice. However you serve them, crostoli promise to be the star of any celebration.
FAQs about Crostoli
How long can I keep crostoli fresh and crispy?
Crostoli stay delightfully crisp when stored in an airtight container at room temperature for up to two weeks. Just let them cool completely before sealing them away to avoid moisture buildup, which can soften the cookies.
Can I make crostoli ahead or freeze the dough?
You can prepare the crostoli dough ahead of time—just wrap tightly and refrigerate for up to a day. For longer storage, you can freeze the dough; thaw in the fridge before rolling out. Finished, fried crostoli aren’t ideal for freezing as they can lose their crispness after thawing.
Is there a substitute for brandy in crostoli?
Absolutely! If you prefer not to use alcohol, swap the brandy in your crostoli dough for an equal amount of milk. This keeps the texture light and lets you stick to tradition, minus the alcohol flavor.
Sweet memories and perfect crostoli to share
There’s a simple magic in making crostoli—the way the dough softens under your hands, the quick dance in hot oil, and that snowy final dusting. Each bite is crisp, sweet, and a little celebratory. Making these Italian pastries fills the kitchen with warmth and a sense of connection, whether for a holiday, carnival, or just a special afternoon. Pile them high, watch the powdered sugar drift, and enjoy your crostoli with those you love most—they’re sure to disappear faster than you think.
More Tasty Ideas
- Irish Shortbread: This sweet treat shares a similar vibe of celebration and is perfect for gatherings.
- St. Patrick’s Day Brownie Trifle: A festive dessert that’s as rich and indulgent as crostoli, making it great for parties.
- Irish Cappuccino: Pair your sweet treats with this delightful beverage for a complete celebratory experience.
Crostoli Recipe
Ingredients
Equipment
Method
- Place the all purpose flour on a clean work surface.
- Make a well in the centre. Add the eggs, egg yolk, sugar, butter, brandy, vanilla extract and salt.
- Use your fingertips or a fork to gradually blend the wet ingredient slowly gathering in flour until the dough starts to come together. Add a little more brandy if needed to form a ball.
- Knead for about 5 minutes until the dough is smooth and elastic.
- Rest the dough for 30 minutes.
- Cut small portion of dough off the “mother” dough.
- Flatten the smaller piece and begin to pass through the pasta machine on the widest setting.
- Fold and pass it through the widest setting. Continue to fold and pass through the pasta machine 5 or 6 times until the dough is smooth.
- Dust with extra flour as required.
- Begin to reduce the setting until you are at the finest setting.
- Pass the dough through the finest setting and place the length of dough on to you work surface. With the Kitchen Aid Pasta roller, I find I need to go through the thinest setting twice. You could also manually (but carefully) stretch the dough to ensure it is as thin.
- Cut the dough along the length into about 2 inches (5 centimeter) strips which will be approximately 4 -6 inches (10-15 centimeters) long. This is just to give you an idea but really how you cut is up to you.
- I make a small cut in the middle of each piece and twist one end through the cut, as you can see above.
- Heat oil in a heavy, high sided frypan.
- When the oil is hot (350°F/180ºC) slip in 3 or 4 crostoli (or more depending on the diameter of the frypan).
- Work quickly because they take about 30 seconds (or less) to cook on each side if you have the oil hot enough. Turn them (I like to use two forks) once a lot of bubbles have formed and before they colour too deeply. Crostoli should be light golden in colour. If they are brown, they are burnt.
- When cooked on both sides, remove them and drain them on absorbent paper. Crostoli will be a little soft but will become more crisp on cooling. If crostoli take too long to cook, it means that the oil is not hot enough, and they will absorb too much oil, resulting in heavy crostoli.
- When cool, dust generously with powdered sugar.
- Store in an airtight container for two weeks.