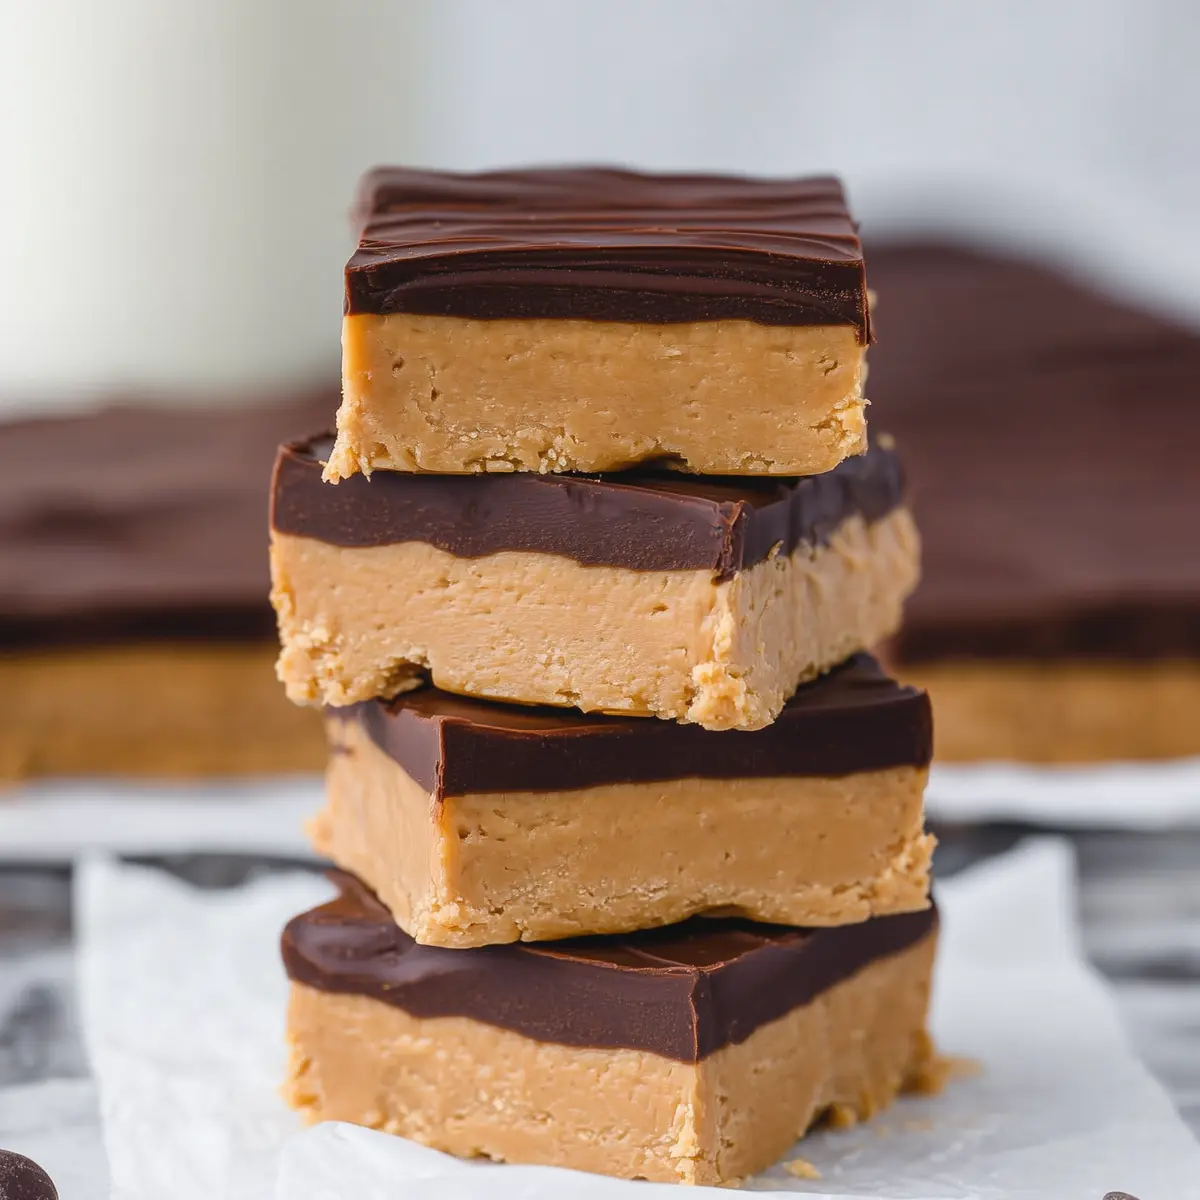
No Bake Peanut Butter Buckeye Bars for Easy Desserts
If you’ve tasted buckeye candies before, you know just how serious the combination of peanut butter and chocolate can get. There are moments—usually around the holidays or when snack cravings strike big—when I fall back on these No Bake Peanut Butter Buckeye Bars. Something shifts in the kitchen: suddenly, there’s that unmistakable aroma of creamy peanut butter swirling together with the deeper, richer smell of melted chocolate, and even the quietest afternoon feels like a special occasion. No fussing with candy thermometers, no shaping sticky balls by hand. Just layers—soft gold beneath a glistening dark top—ready to slice and devour.
These bars aren’t just easy; they’re a little bit nostalgic, but so much faster than making Buckeye balls one by one. There’s a comfort in that old-school flavor, but making them as bars lets you serve up a whole tray at a time, and I’d be lying if I said I didn’t love how that looks for a party or game day dessert. The first bite always takes you there: smooth, sweet, and just the right amount of contrast between salty nut and bittersweet chocolate. They’re the kind of treat you keep in the fridge for “just in case,” knowing full well they won’t last long.
Why No Bake Peanut Butter Buckeye Bars Feel Like a Celebration
There’s something about slicing into a tray of these bars that just calls for a little pause before the first bite. Maybe it’s the glossy spread of chocolate on top, or the way the peanut butter layer melts ever so slightly against your knife, leaving crumbs you can’t resist nibbling. When friends stop by or I need to whip up dessert for family dinner, No Bake Peanut Butter Buckeye Bars make me look like I went all out—no oven required, no candy molds or tricky coatings to fuss with. You’re rewarded with old-fashioned flavor in a much less fussy package, and somehow, this simple treat always brings out a sense of occasion.
This isn’t just a quick dessert; it’s a shortcut to that nostalgic peanut butter cup taste, but dialed up, with just enough homemade flair to make you proud. I’ve watched little kids go silent with the first bite, eyes wide, and adults mumbling “wow” through a mouthful of bittersweet chocolate and crumbly, lush peanut butter. There are never leftovers. And if by some miracle a square or two does make it to the second day, it’ll taste every bit as indulgent as the first.
The Ingredients That Give These Bars Their Addictive Flavor
- Butter – not just for richness, but to keep the peanut butter base dense, smooth, and slightly salty; you really want the soft, spreadable type.
- Creamy peanut butter – the star, lending that nutty, familiar flavor and helping everything stick together; a classic supermarket brand works best, but you can swap in a natural peanut butter if you stir it super well.
- Powdered confectioners’ sugar – this binds everything and adds just the right note of melt-in-your-mouth sweetness while keeping the texture light.
- Vanilla extract – a splash goes a long way, rounding out the flavor and giving each bite a warm, bakery-style aroma.
- Chocolate chips or chunks – go dark, milk, or even semi-sweet; you’ll melt them for the ganache-like top layer, and the flavor is all up to you.
- Butter or coconut oil (for the chocolate topping) – just a spoonful melts right in, giving the chocolate a silkier finish and helping it slice cleanly once set.
See the recipe card below for the full list of ingredients and measurements.
From Creamy to Crunchy: Building the Perfect Bars
Start by mixing your softened butter with peanut butter, powdered sugar, and vanilla in a big bowl. I usually grab an electric mixer for this step, because the dough starts crumbly but quickly becomes smooth and thick—the kind that sticks to your spatula as you scrape the sides. If you pause to taste, it should remind you of the inside of your favorite peanut butter cup, just a little on the grainy side at first but becoming softer as the butter blends in.
Line a pan with parchment paper so you can lift your bars out easily later on. Scrape that peanut butter mixture right in, and here’s where you need a little arm strength: press it down firmly, packing it into every corner. The more compact your peanut butter layer, the neater the bars slice once chilled.
Meanwhile, melt your chocolate chips with a bit of butter or coconut oil. You want smooth, pourable chocolate—shiny, not scorched, and not so hot that it seizes when it hits the peanut butter. I go for short bursts in the microwave, stirring well between each one, until it’s completely fluid and glossy. Pour it all over the base and use the back of a spoon, or an offset spatula if you’re feeling fancy, to spread it right to the edges.
Now comes the hardest part: waiting. The chocolate needs time to set at room temperature until it’s no longer gooey. If your kitchen is on the warm side, pop the pan in the fridge for a while before you attempt to slice.
How the Layers Come Together for No Bake Peanut Butter Buckeye Bars
The magic here is all about layering textures. The key is to press the peanut butter mixture into a completely even layer; use clean hands or a small rolling pin if you want precision. The more firmly you press, the better your bottom layer will hold its shape.
Once the chocolate is melted, wait until it’s a bit warm but not steaming—pour that over your already-set peanut butter base. Don’t rush the spreading; slow, wide strokes help you create a smooth, shiny top that’s totally irresistible. If you’re tempted to add anything extra, a light dusting of flaky sea salt or a handful of mini chocolate chips sprinkled over the melted chocolate makes for a fun twist.
After pouring, let the bars rest until the chocolate becomes firm to the touch, then cut them right in the pan or lift them out with the parchment for cleaner squares. Use a sharp, warm knife (just run it under hot water and dry first) so you get neat, sharp-edged bars without cracking the chocolate.
Chill these bars, but don’t serve them straight from the ice box unless you’re into jaw workouts—the refrigeration firms them up, but 5 minutes on the counter brings back the perfect bite.
The Flavor and Texture That Keep You Coming Back
What makes these No Bake Peanut Butter Buckeye Bars so ridiculously moreish? It’s all about the interplay: a dense, sweet, peanutty base that gives under your teeth but doesn’t stick to the roof of your mouth, and a slick, slightly snappy chocolate layer that melts soon after it hits your tongue. The aftertaste is the real reward—a slow fade from cocoa to that last sigh of vanilla-laced peanut butter.
That first bite is always familiar: if you’ve ever had a peanut butter cup, imagine it stretched and intensified, more tender through the middle and with a cleaner snap on top. There’s a little hint of salt in the mix and almost a fudge-like finish, but lighter—less sticky, more buttery, less cloying than fudge ever is. And you get that cool, almost truffle-like creaminess when the bars come straight out of the fridge, which is a texture I can’t help but love.
Secrets to Nailing Buckeye Bars Every Time
If you want your bars to be sliceable (not mushy or crumbly), this is where a few small tweaks can really save the day.
- Always use creamy, shelf-stable peanut butter for the base, not a super oily or all-natural jar, or you may find the mixture won’t set up as firmly.
- Press the peanut butter layer down as hard as you can—use a small rolling pin, or go at it with clean hands and the back of a glass.
- If your dough feels too sticky or loose, add a touch more powdered sugar; if it’s too stiff or chalky, try kneading in a small amount of extra peanut butter.
- For the chocolate topping, make sure it’s fully melted (no lumps) but not piping hot, or it’ll melt the base and mix into it instead of holding its shape.
- Allow enough time for chilling—impatience is the enemy of clean, beautiful bars!
- Want to switch things up? Fold in mini pretzels for salty crunch, use white chocolate on top for something entirely different, or swap in almond butter for a fun twist.
- Store bars in a sealed container in the fridge for several days, or freeze between layers of parchment for up to a month—just let them come to room temperature before enjoying so the chocolate doesn’t shatter.
Serving No Bake Peanut Butter Buckeye Bars for Every Occasion
There are few desserts as easy to dress up or down as these bars. I cut large squares when it’s just family, but for parties or a dessert table, slicing them into bite-size rectangles or small cubes always gets more mileage out of each pan. Try stacking them on a tiered platter for a dramatic effect, or wrap up a few in wax paper as an edible gift—these hold up beautifully for gifting and will survive a road trip or lunchbox journey without turning to mush.
If you want to get a bit fancy, pair them with scoops of vanilla ice cream, let them mingle on a plate beside fresh berries, or even crumble one over oatmeal or yogurt for a not-so-innocent breakfast. When fall or winter holidays roll around, a sprinkle of cinnamon over the chocolate can warm up the flavors, or try a drizzle of extra melted chocolate for a little style.
As for the best part—these bars are friendly for gluten-free eaters, so you can serve a tray without worrying about most common allergies (always check your labels, of course). No matter when you serve them, though, be prepared for the pan to empty out faster than you expect.
FAQs about No Bake Peanut Butter Buckeye Bars
Can No Bake Peanut Butter Buckeye Bars be made ahead of time?
Absolutely! This recipe is perfect for advance prep. Once made and chilled, the bars actually improve as they sit, holding up for several days in the fridge. You can slice them when ready to serve, and no one will guess they weren’t just made that morning.
What if my peanut butter layer doesn’t firm up?
If the mixture is too soft, it usually means your peanut butter was too oily, or maybe not enough powdered sugar was added. Try working in a little more powdered sugar until the dough is thick and just crumbly, or briefly chill the dough before pressing it into the pan to help it hold its shape.
How should I store leftover No Bake Peanut Butter Buckeye Bars?
Keep any extras in an airtight container in the refrigerator. This keeps the layers set and stops the chocolate from getting too soft. If you need them to last even longer, you can freeze them with parchment between layers, then thaw a few bars at a time as needed.
Can I use crunchy peanut butter or try a different nut butter in these bars?
You sure can! Crunchy peanut butter will give the base a bit of texture and extra peanut pieces, which some people really love. Almond or cashew butter also work, but keep in mind that natural butters can make the bars softer, so add more powdered sugar if you need a sturdier base.
Some desserts are good enough to blur the line between everyday and celebration, and No Bake Peanut Butter Buckeye Bars do just that. Cool, rich, layered, and packed with an almost impossible-to-resist peanut butter and chocolate flavor, they’re a quick ticket to comfort—no oven or candy molds required. Make a batch, stash them in the fridge, and see how long you can go before sneaking a second piece. Wrapped up in a little chocolate shell and a peanut butter heart, these bars always bring back the best kind of memories.
More Delicious Recipes
- Lucky Charms Bars: These no-bake bars combine marshmallows and cereal for a sweet, fun treat, making them great for any special occasion.
- St. Patrick’s Day Brownie Trifle: Layered desserts like this trifle are perfect for celebrations, bringing together rich chocolate flavors and creamy textures.
- Irish Potato Bites: These delicious bites offer a unique taste that pairs wonderfully with sweet treats and are perfect for holidays or gatherings.
No Bake Peanut Butter Buckeye Bars
Ingredients
Equipment
Method
- Place 1/2 cup of butter, peanut butter, powdered sugar, and vanilla extract in a large bowl. Beat using an electric mixer until smooth. The dough will be very thick and a little crumbly.
- Line a 9x13-inch pan with parchment paper. Transfer the peanut butter dough into the pan. Press the dough firmly into the dish.
- Add chocolate chips and the remaining 1 tablespoon of butter into a microwave-safe bowl. Microwave in 30-second increments, stirring between intervals, until smooth (about a minute and a half total).
- Pour the melted chocolate over the top of the bars and spread evenly. Let sit at room temperature until the chocolate has set, 30-60 minutes. Carefully remove the bars from the pan by pulling up on the excess parchment paper, and transfer to a cutting board. Slice with a sharp knife.
- Place in the refrigerator for at least 1 hour, or until ready to serve.