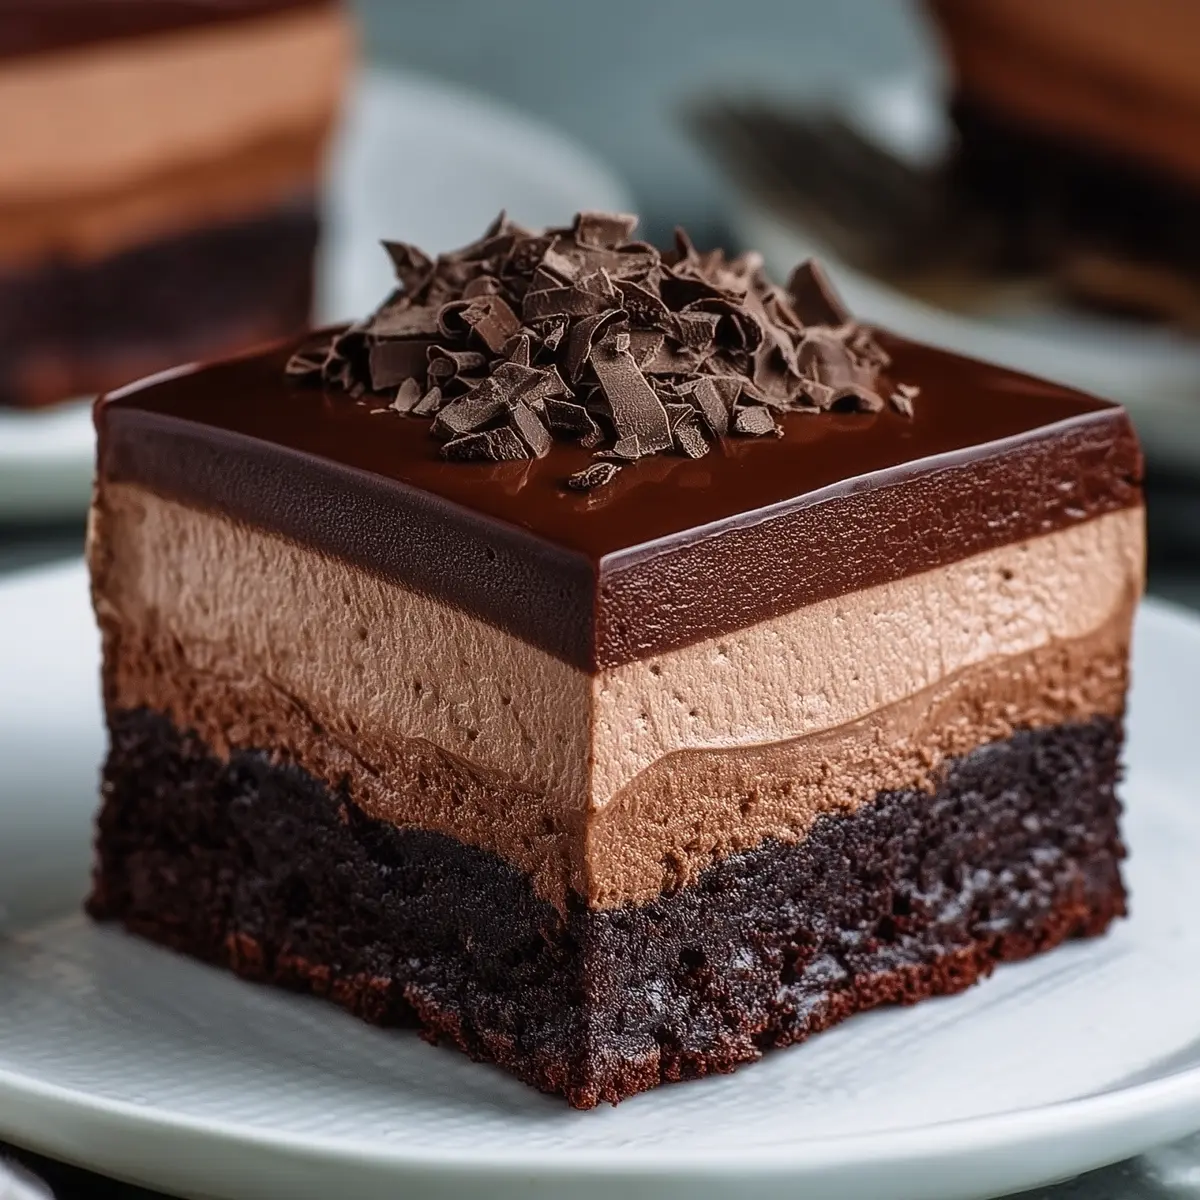
Chocolate Mousse Brownies: A Decadent Delight
There’s something about sliding a knife through the lush top of chocolate mousse that instantly feels like a celebration, whether it’s a Sunday afternoon or just an average Wednesday. Chocolate Mousse Brownies are the kind of dessert that draw eyes on any table. There’s that moment you press your fork into the silky mousse, hit the dense, chewy brownie layer, and a thin sheen of chilled ganache clings to the surface—it’s impossible to resist. I first made these for a late-night movie marathon with a few friends, but now they’ve turned into my go-to for holidays and winter get-togethers. Every bite delivers deep cocoa, a cool creamy mousse, and just the right balance of sweetness without feeling heavy. If you crave truly decadent chocolate desserts with layers of contrasting textures, this one’s a keeper.
What makes these Chocolate Mousse Brownies so special
When you layer chocolate mousse over classic brownies and crown the whole thing with ganache, you get something magical. These brownies are all about contrast: dense, chewy chocolate base, a whipped, fluffy mousse, and a glossy ganache that cracks slightly with each forkful. They’re elegant enough for a Christmas centerpiece but casual enough to bring along to a weekend potluck—trust me, nobody ever leaves the tray untouched.
Something about serving them chilled makes the flavors pop: the brownie is intensely chocolatey but doesn’t overwhelm, the mousse is light and not too sweet, and that ganache is pure velvet. If you love desserts where every bite reveals a new texture, this mashup is a must-try. Bonus: they slice up beautifully and hold their layers perfectly, so you end up with seriously photogenic squares. Sometimes I find myself saving the corner pieces just for that extra chewy edge.
The ingredients that make these brownies a showstopper
Baking magic starts with the right ingredients, especially for Chocolate Mousse Brownies where every layer brings something different to the table. Here’s what you’ll need:
- Butter – gives the brownie base its richness and fudgy texture. If you only have salted, just reduce any added salt.
- Granulated sugar – sweetens and keeps the brownies moist as they bake.
- Eggs – bind everything together and add structure so the brownies don’t collapse under the mousse.
- Vanilla extract – rounds out the cocoa and chocolate notes, making the whole dessert taste “finished.”
- Unsweetened cocoa powder – delivers a deep chocolate hit and that dark, classic brownie color.
- All-purpose flour – just enough to hold the base, but not so much that things turn cakey.
- Salt and baking powder – balance the sweetness, and baking powder ensures a subtle lift so brownies aren’t too dense.
- Heavy whipping cream – the backbone of the mousse; you want it super cold for best results.
- Semisweet chocolate – melted into the mousse and ganache for that unmistakable chocolatey depth. You can play with bittersweet if you want a more grown-up vibe.
- Milk – softens the chocolate for the mousse so it folds smoothly into the whipped cream.
- Powdered sugar – lightly sweetens the whipped cream, letting the chocolate flavor lead.
See the recipe card below for the full list of ingredients and measurements.
Bringing Chocolate Mousse Brownies together step by step
The beauty of these brownies is how every layer gets its moment to shine, and you’ll build it all right in one pan. I like to prep the pan ahead so nothing sticks, and start by making the brownie base—your whole kitchen will smell like a cozy chocolate bakery, I promise.
- Start by preheating your oven and lining a square baking pan. Leave a little parchment overhang so you can lift out the brownies later without any stress.
- Whisk the melted butter with sugar, eggs, and vanilla extract in a bowl until smooth and glossy. It should look thick and almost ribbon-like when you lift the whisk out.
- Sift in the cocoa powder, flour, salt, and baking powder. Fold gently—over-mixing means a cakier brownie, so just go until everything’s combined with no dry pockets.
- Pour the batter into your pan, smooth the top, and bake until a toothpick brings up moist crumbs but not wet batter. Let it cool completely before moving on—this part is vital for sharp layers.
- While the base cools, heat a bit of milk until steaming and pour it over finely chopped chocolate for the mousse. Let it sit before stirring so everything melts into a silky mix. Cool it to room temperature.
- Whip the cold cream and a sprinkle of powdered sugar until soft peaks form—think gentle curves rather than stiff tips.
- Loosen the chocolate base with a spoonful of whipped cream, then gently fold in the rest. Be patient here so your mousse stays light and airy.
- Spread the mousse over the brownie base and set it in the fridge for at least a couple of hours. The waiting is the hardest part, but it’s worth it for that perfect mousse texture.
- For the final flourish, make a classic ganache by simmering cream and pouring it over more chopped chocolate. Stir until glossy, then let it cool just enough to spread. Smooth it over the set mousse and chill again so everything firms up.
- Once fully set, lift out the brownies, pop onto a cutting board, and slice using a sharp knife—wipe between cuts for those Instagram-worthy edges.
Getting that perfect mousse and brownie contrast
The secret to memorable Chocolate Mousse Brownies comes down to patience (I know, it’s tough). Give the brownies time to cool completely before you even think about layering the mousse. If the base is still warm, the mousse will slump rather than sit up tall and fluffy. I also find that folding the whipped cream into melted chocolate takes a light hand—go too fast, and you risk deflating all that glorious air. Work in batches, keep things gentle, and you’ll get a mousse that floats atop each slice.
The final ganache layer should be just cool enough so it doesn’t melt the mousse but still spreadable for a seamless top. The payoff is those layers: crisp, neat, and easy to cut. There’s a little thrill every time you see the knife slide through each stratum—dark, pale, then glossy—before landing on the plate.
Making these brownies your own: servings and storage
Don’t be afraid to riff a little if you’re feeling adventurous. Swap semisweet chocolate for bittersweet or even milk chocolate if that’s how you roll. Add a dash of espresso powder to the brownie base for a coffee-chocolate twist, or stir in orange zest to the mousse for a holiday vibe. You can scatter toasted nuts over the ganache or sprinkle some flaky salt before chilling for that artisan bakery touch.
Chocolate Mousse Brownies need to be served cold—let them sit at room temp for just a couple of minutes out of the fridge, and you’ll get the mousse at its best. As for storing, keep them in an airtight container in the fridge; they’ll stay luscious for several days. If you need to get ahead on holiday baking, you can make the brownies a day in advance and finish with mousse and ganache when you have a spare moment. Freezing works, too—just slice before freezing and layer parchment between pieces for easy snacking down the line.
FAQs about Chocolate Mousse Brownies
Can I use store-bought brownie mix for Chocolate Mousse Brownies?
Absolutely! If you’re short on time or have a favorite boxed mix, you can use it for the base. Just be sure to cool the brownies completely before adding the mousse and ganache layers.
How long do Chocolate Mousse Brownies keep fresh in the fridge?
They’ll stay delicious for about 4–5 days in an airtight container in the fridge. The mousse might begin to firm up a bit more over time, but the flavors stay rich and satisfying.
Can I freeze Chocolate Mousse Brownies for later?
Yes, you can freeze these brownies. Cut them into individual squares, separate with parchment, and store in an airtight container. Thaw them in the fridge overnight before serving for best texture.
What are some fun ways to decorate or serve Chocolate Mousse Brownies?
Dust the top with cocoa powder, add chocolate curls, or scatter a few berries over each square for a fresh pop of color. They pair well with a scoop of vanilla ice cream or a spoonful of lightly whipped cream alongside.
Is it possible to make the mousse layer with white chocolate instead?
Definitely! Swap the semisweet chocolate in the mousse for white chocolate if you prefer a sweeter, creamier flavor. Everything else in the method stays the same—just melt, fold, and chill.
After one slice of these Chocolate Mousse Brownies, you’ll understand why they never last long. Each square offers a perfect blend of creamy, chewy, and melt-in-your-mouth chocolate flavors that feel like an occasion in themselves. Whether you’re prepping ahead for a big family gathering or just indulging your own sweet tooth, these brownies deliver pure joy every single time—best savored straight from the fridge, cold and dreamy.
More Delicious Recipes
- St. Patrick’s Day Brownie Trifle: This dessert combines layers of brownies with creamy goodness, similar to the textures in your mousse brownies.
- Lucky Charms Bars: These sweet bars feature layers that also capture the joy of dessert indulgence reminiscent of your Chocolate Mousse Brownies.
- Irish Shortbread: A buttery, crumbly treat that complements the rich chocolate flavors of your mousse brownies.
Chocolate Mousse Brownies Recipe
Ingredients
Equipment
Method
- PREPARE THE PAN: Preheat the oven to 350°F (175°C) and line an 8x8-inch (20x20 cm) square baking pan with parchment paper, leaving a slight overhang on the sides for easy removal.
- MAKE THE BROWNIE BATTER: In a large bowl, whisk together the melted butter, granulated sugar, eggs, and vanilla extract until smooth and well combined.
- ADD DRY INGREDIENTS: Sift in the cocoa powder, flour, salt, and baking powder. Gently fold the dry mixture into the wet ingredients just until no streaks remain. Do not overmix.
- BAKE THE BROWNIE LAYER: Pour the batter into the prepared pan and smooth the top with a spatula. Bake for 20 to 25 minutes until a toothpick inserted into the center comes out with a few moist crumbs. Let the brownie base cool completely in the pan.
- MAKE THE MOUSSE BASE: Heat the milk in a small saucepan over low heat until just steaming. Pour it over the chopped chocolate in a heatproof bowl. Let it sit undisturbed for 2 minutes, then stir until fully melted and smooth. Let the mixture cool to room temperature.
- WHIP THE CREAM: In a separate bowl, beat the chilled heavy cream and powdered sugar until soft peaks form.
- FOLD TO COMBINE: Stir a spoonful of whipped cream into the cooled chocolate mixture to loosen it. Gently fold the remaining whipped cream into the chocolate until fully blended and airy. Avoid deflating the mousse.
- ASSEMBLE MOUSSE LAYER: Spread the chocolate mousse evenly over the cooled brownie base using a spatula. Refrigerate the pan for at least 2 hours, or until the mousse is set.
- MAKE THE GANACHE: Place the chopped chocolate in a heatproof bowl. Heat the heavy cream in a small saucepan until it begins to simmer. Pour the hot cream over the chocolate and let sit for 2 to 3 minutes. Stir until smooth and glossy.
- ADD GANACHE TOPPING: Pour the ganache over the chilled mousse layer and smooth the surface with an offset spatula. Return the pan to the refrigerator for 1 hour, or until the ganache is firm.
- SLICE AND SERVE: Once fully set, lift the dessert out of the pan using the parchment overhang. Slice with a clean, sharp knife, wiping between cuts for neat edges.