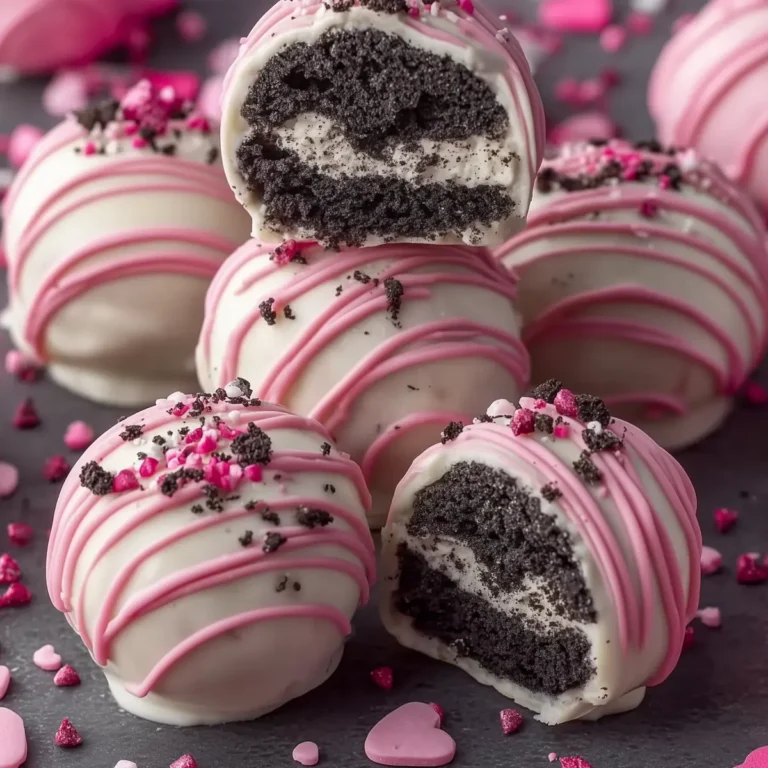
3 Ingredient Oreo Balls: Quick and Easy Dessert Treats
If you’ve ever found yourself staring into the pantry, needing a quick dessert for a last-minute party or just an emergency chocolate fix, these 3 Ingredient Oreo Balls will be your new lifesaver. The richness of Oreos, the tang of creamy filling, and that irresistible crack of almond bark coating—no baking, no fancy equipment, just pure sweet magic. These little treats look much fancier than the effort they require and always disappear fast at any gathering.
Straight out of my own “oops, I need a treat right now” kitchen moments, this is the kind of recipe you whip up when you want big results with the tiniest amount of fuss. If you love desserts with creamy middles, chocolate shells, and that hint of crunchy cookie, you’ll fall hard for these Oreo balls. And with only three humble ingredients, they’re pretty much foolproof—even if your only culinary skill is pressing start on a microwave.
Why These 3 Ingredient Oreo Balls Are So Special
Let’s be honest—most of us don’t plan out dessert three days ahead. If I need something sweet after dinner, or guests text to say they’re “stopping by for coffee,” these 3 Ingredient Oreo Balls are my go-to secret weapon. They come together with just a handful of basics, but look like elegant little truffles once you’re done. People always rave about their creamy centers and that chocolatey snap on the outside.
These are the ultimate bite-sized treat for the holidays, but they work just as well for birthdays, picnics, or plain old Tuesday nights. You don’t need any oven time, and cleanup is a breeze. I’ve brought them to potlucks where they vanished before anyone could ask for the recipe, and I’ve also hidden a few in the fridge for those emergency “just one more” moments.
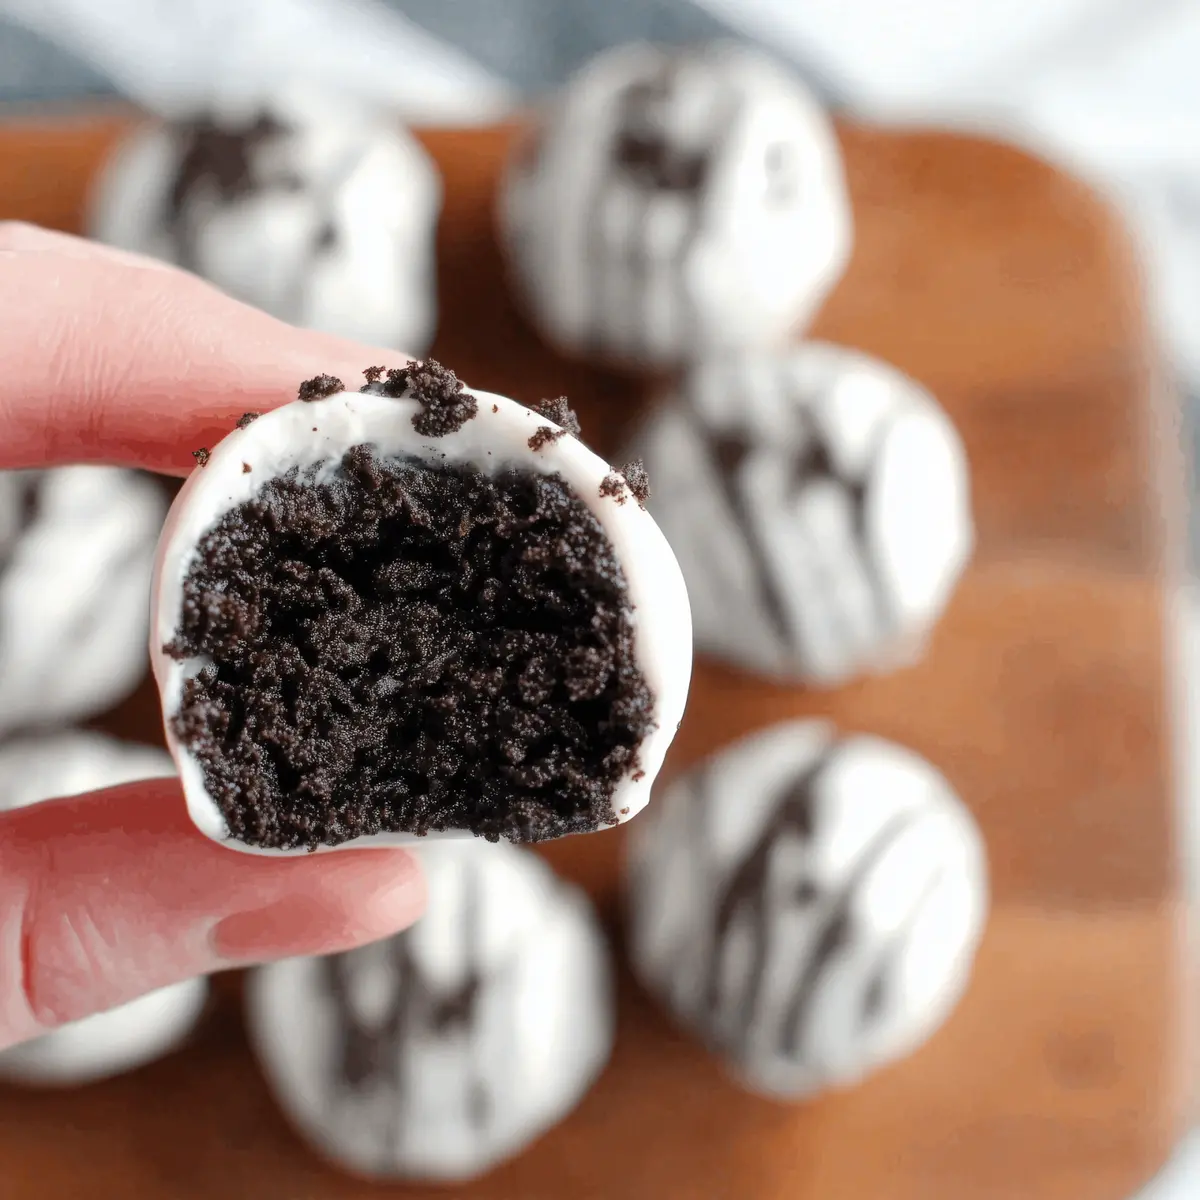
What really makes these Oreo balls stand out is the texture: a cookie-crumb filling that tastes almost fudge-like, wrapped in a perfectly smooth chocolate shell. The contrast is dreamy. They always satisfy that craving for something both nostalgic and decadent, without any stress or complicated steps.
What You Need for These Oreo Balls
You’ll only need three simple things to pull off these little treats, and I bet you already have at least two at home. Here’s what goes into every batch:
- Oreos – The chocolate cookie and sweet filling bring all that classic Oreo flavor and pack a satisfying crunch. Any generic chocolate sandwich cookie works in a pinch, but nothing beats the original.
- cream cheese – This is what gives the inside its velvety, truffle-like richness. It blends perfectly with the crumbs, adding just the right amount of tang. Let it soften on the counter for easy mixing.
- Almond bark (or melting chocolate) – For that glossy, snappy shell. Almond bark sets up quickly and gives a smooth finish, but you can swap in any chocolate coating if you like it darker or want to experiment with flavors.
See the recipe card below for the full list of ingredients and measurements.
How to Make 3 Ingredient Oreo Balls Step by Step
Let’s get these beauties ready! Here’s the easiest, no-bake way to get impressive homemade Oreo truffles every time.
- Crush your Oreos. Toss them straight into a food processor and pulse until you’ve got fine, even crumbs—like dark, chocolatey sand. If you don’t have a food processor, just slide the cookies into a sturdy zip-top bag and bash them with a rolling pin. It gets out all your stress and works surprisingly well!
- Mix with cream cheese. In a large bowl (or with your stand mixer if you want to avoid sticky hands), combine those Oreo crumbs and the softened cream cheese. At first it’ll look messy, but keep going—you want a thick, uniform dough where you can’t see big streaks of white.
- Roll into balls. Scoop a spoonful of the dough and quickly roll it between your palms. Each ball should feel dense and smooth, with no sticky bits clinging to your hands. Set them aside on a parchment-lined tray—that little rest helps them hold their shape.
- Melt the almond bark. Break up the coating into a microwave-safe bowl and heat in short bursts, stirring often. You’re after a glossy, pourable texture. Keep a close eye—nothing ruins a batch like scorched chocolate.
- Dip, tap, and set. Drop one ball at a time into the melted chocolate. Use a fork or a spoon to cover every side, then lift it out, letting the excess drip off so you don’t end up with puddles. Place the finished balls back on your tray and pop them in the fridge so the shell hardens quickly.
- Store for later. Once the chocolate is firm, transfer your Oreo balls to an airtight container. They keep beautifully chilled in the fridge, ready for cravings or company.
Little Tricks for the Best Oreo Balls Every Time
Even a simple recipe like this has its share of secret tips—usually learned the hard (messy) way. Here’s how to make your 3 Ingredient Oreo Balls turn out perfect and party-ready:
Let your cream cheese soften at room temperature before mixing. Cold cream cheese will clump up and make blending the dough feel like a workout. If you forgot and need to soften it quickly, cut it into cubes and zap it briefly in the microwave (low power, just until barely soft).
When crushing the Oreos, get them as fine as possible. A sandy texture blends smoothly and makes the inside of your balls truffle-like. Coarse chunks taste good, but your filling might look grainy.
Keep your rolled balls cool while dipping. If your kitchen is warm, try freezing them for a few minutes before dunking—they keep their shape much better and don’t fall apart in the melted coating.
For dipping, use a fork or two spoons to avoid big chocolate puddles under each ball. Let just enough chocolate drip off before you transfer them back to the tray.
Don’t rush the setting step. Chilling until the chocolate is fully hard means you’ll get that gorgeous shell and satisfying snap when you bite in. If you’re working ahead, store finished Oreo balls in a well-sealed container in the fridge—they’ll stay fresh for days.
Fun Twists and Serving Ideas for Oreo Balls
Want to jazz up your 3 Ingredient Oreo Balls or make them fit the season? Try these easy creative ideas:
- For a festive touch, top your freshly dipped Oreo balls with colored sprinkles, cookie crumbs, or a drizzle of contrasting chocolate while the coating is still tacky.
- Swap the almond bark with white, dark, or even ruby chocolate for a different look and flavor—each gives its own twist.
- Mix in a pinch of espresso powder to the Oreo filling for a subtle mocha kick, or stir in a sprinkle of sea salt before dipping for a sweet-and-salty vibe.
- Hosting a gathering? Serve your Oreo balls on popsicle sticks for easy handling—kids go wild for Oreo “cake pops.”
- For holidays, try rolling the balls smaller and serving as part of a dessert platter alongside fresh fruit or salty snacks. A little bowl of these is perfect with coffee or hot chocolate.
- If you love variation, experiment with different cookie flavors: mint Oreos, peanut butter sandwich cookies, or even those fun limited-edition Oreos that pop up around the holidays.
- These Oreo balls freeze beautifully. Pop them in a container (with parchment between layers) and freeze. Thaw for a few minutes at room temp before serving—great for last-minute sweet treats.
FAQs about 3 Ingredient Oreo Balls
How should I store 3 Ingredient Oreo Balls to keep them fresh?
Keep your Oreo balls in an airtight container in the fridge. They’ll hold their texture and flavor for about a week. Always let them come to room temperature for a few minutes before serving to bring out the best creaminess.
Can I freeze these Oreo balls for later?
Yes, absolutely! Place the finished balls on a baking sheet to freeze solid, then transfer to a covered container with parchment between layers. They’ll last for a couple of months in the freezer. Thaw before serving so the centers aren’t too firm.
What can I use instead of almond bark for the coating?
If you can’t find almond bark or prefer a different flavor, melting chocolate (dark, milk, or white) works just as well. Just make sure it’s a type that sets up firmly. Candy melts and even baking chocolate are great substitutes.
Do I really have to use cream cheese, or is there another option for the filling?
Cream cheese gives the filling its signature creamy, tangy taste, but if needed you can try mascarpone or a thick, spreadable dairy-free alternative. Just make sure your swap has a similar soft texture, or the truffle mixture won’t come together as smoothly.
With just a handful of pantry staples, these 3 Ingredient Oreo Balls promise big flavor in the tiniest bites. Whether you’re prepping for a party, sharing with family, or rewarding yourself after a long day, each ball offers that perfect combo of creamy center and cool chocolate shell. They’re effortless, endlessly customizable, and honestly a little addictive. Pour yourself a cup of coffee, grab an Oreo ball (or three), and savor the sweet simplicity.
More Delicious Recipes
- St. Patrick’s Day Brownie Trifle: This decadent dessert features layers of brownie, cream, and toppings, perfect for satisfying your sweet tooth like the Oreo balls.
- Irish Beef Stew: A hearty dish to balance out those sweet treats, offering rich flavors and comforting vibes.
- Lucky Charms Cookies: These colorful cookies bring a fun twist to baking, similar to the playful nature of Oreo balls.
Easy 3 Ingredient Oreo Balls
Ingredients
Equipment
Method
- Remove Oreos from the package, break them in half and add them to a food processor in two batches. Pulse the food processor to crush the Oreos into a fine texture. If you don't have a food processor, add the Oreos into a gallon zip top baggie, and use a rolling pin to hit the bag and break apart the Oreos. You won't get as fine of a texture, but they will be equally delicious!
- In a stand mixer or a large bowl, mix together the softened cream cheese and crushed Oreos until everything is completely combined. If you are doing this by hand, it will take a while and require some elbow grease, but it will come together!
- Using a tablespoon measure (or you can eyeball it), scoop the Oreo and cream cheese mixture and roll into balls.
- In a small mixing bowl, melt half of your almond bark in the microwave in 30 second increments, stirring after each increment, until it's completely melted. It should take about a minute and a half total.
- Place one ball into the almond bark, and using a spoon, coat it evenly. Once it's completely coated, lift the Oreo ball out of the chocolate and allow the excess to run off. Place it on tin foil to allow the chocolate to harden for about 10 minutes or so.
- Store in an airtight container in the refrigerator for up to a week!